Azure Developer CLI: The CLI created for Azure Developers
The Azure Developer CLI (azd) simplifies infrastructure as code and application deployment using reusable templates so you can focus on writing code instead of setting things up in Azure.

What is the Azure Developer CLI?
The Azure Developer CLI is an open-source command-line tool, developed by Microsoft and written in Go, that helps provision Azure resources and deploy applications to them by accelerating and simplifying the process.
It also incorporates best practices such as:
- use of infrastructure-as-code
- use of CI/CD pipelines
- support for multiple staging environments like dev, test, and production
The goal is to simplify and accelerate the provisioning of Azure resources and the deployment of applications to them. The target audience includes developers who need to perform the same tasks repeatedly, as well as platform engineers who want to create standardized environments for development teams. The latter can be achieved through templates, which we will explore in the next section.
What is an azd template?
If we want to understand how azd works, we need to know what templates are and why they are used. A template is nothing more than a folder and file structure. Since azd is a command-line tool, it expects certain files to exist in specific locations in order to execute a command successfully. Let’s take a closer look at the structure:
1
2
3
4
5
6
📁 root
├── 📁 .azure         Configuration of the environments
├── 📁 .github|.azdo  GitHub workflow or Azure DevOps pipeline
├── 📁 infra          Infrastructure as code
├── 📁 src            Application code
└── 📄 azure.yaml     Links application and infrastructure code
At a high level, a template consists of the following parts:
.azurefolder: Contains the configuration for environments like dev, test, and prod. This is used for local deployments. This folder is ignored by default via the.gitignorefile and therefore not checked into Git..githubor.azdofolder: Contains the GitHub workflow or the Azure DevOps pipeline.azdsupports both. Other CI/CD platforms can also be configured according to the documentation.infrafolder: The default IaC language is Bicep. Terraform is also supported, but requires a bit more configuration due to the state file. Other languages can be configured as well.srcfolder: Contains the application code. If you have one application, this folder can serve as the root. If you have multiple applications (for example, a frontend and a backend), you can use subfolders.azure.yaml: Contains the common configuration, such as the selected IaC language (Bicep or Terraform), as well as the mapping between application code and infrastructure code so thatazdknows which application to deploy to which Azure resource.
A template structure might look like this based on your selections:
1
2
3
4
5
6
7
8
9
10
11
12
13
14
15
📁 root
├── 📁 .azure
│   ├── 📁 dev
│   │   └── 📄 .env
│   └── 📁 prod
│       └── 📄 .env
├── 📁 .github
│   └── 📁 workflows
│       └── 📄 azure-dev.yaml
├── 📁 infra
│   └── 📄 main.bicep
├── 📁 src
│   ├── 📁 web
│   └── 📁 api
└── 📄 azure.yaml
Here we see that:
- Two environments are configured: dev and prod.
- GitHub Actions is configured.
- Bicep is used.
- Two applications are defined.
This is a template that can be shared by platform teams with development teams for reuse. One example could be a template with the basics of an Application Landing Zone containing only the bare minimum. Developers can then use this as a foundation to build their applications on top of.
What is a template gallery?
Galleries are websites where azd templates can be found and used as starting points. They are essentially simple web pages with deep links to Git repositories. At the time of writing, two well-known galleries are:
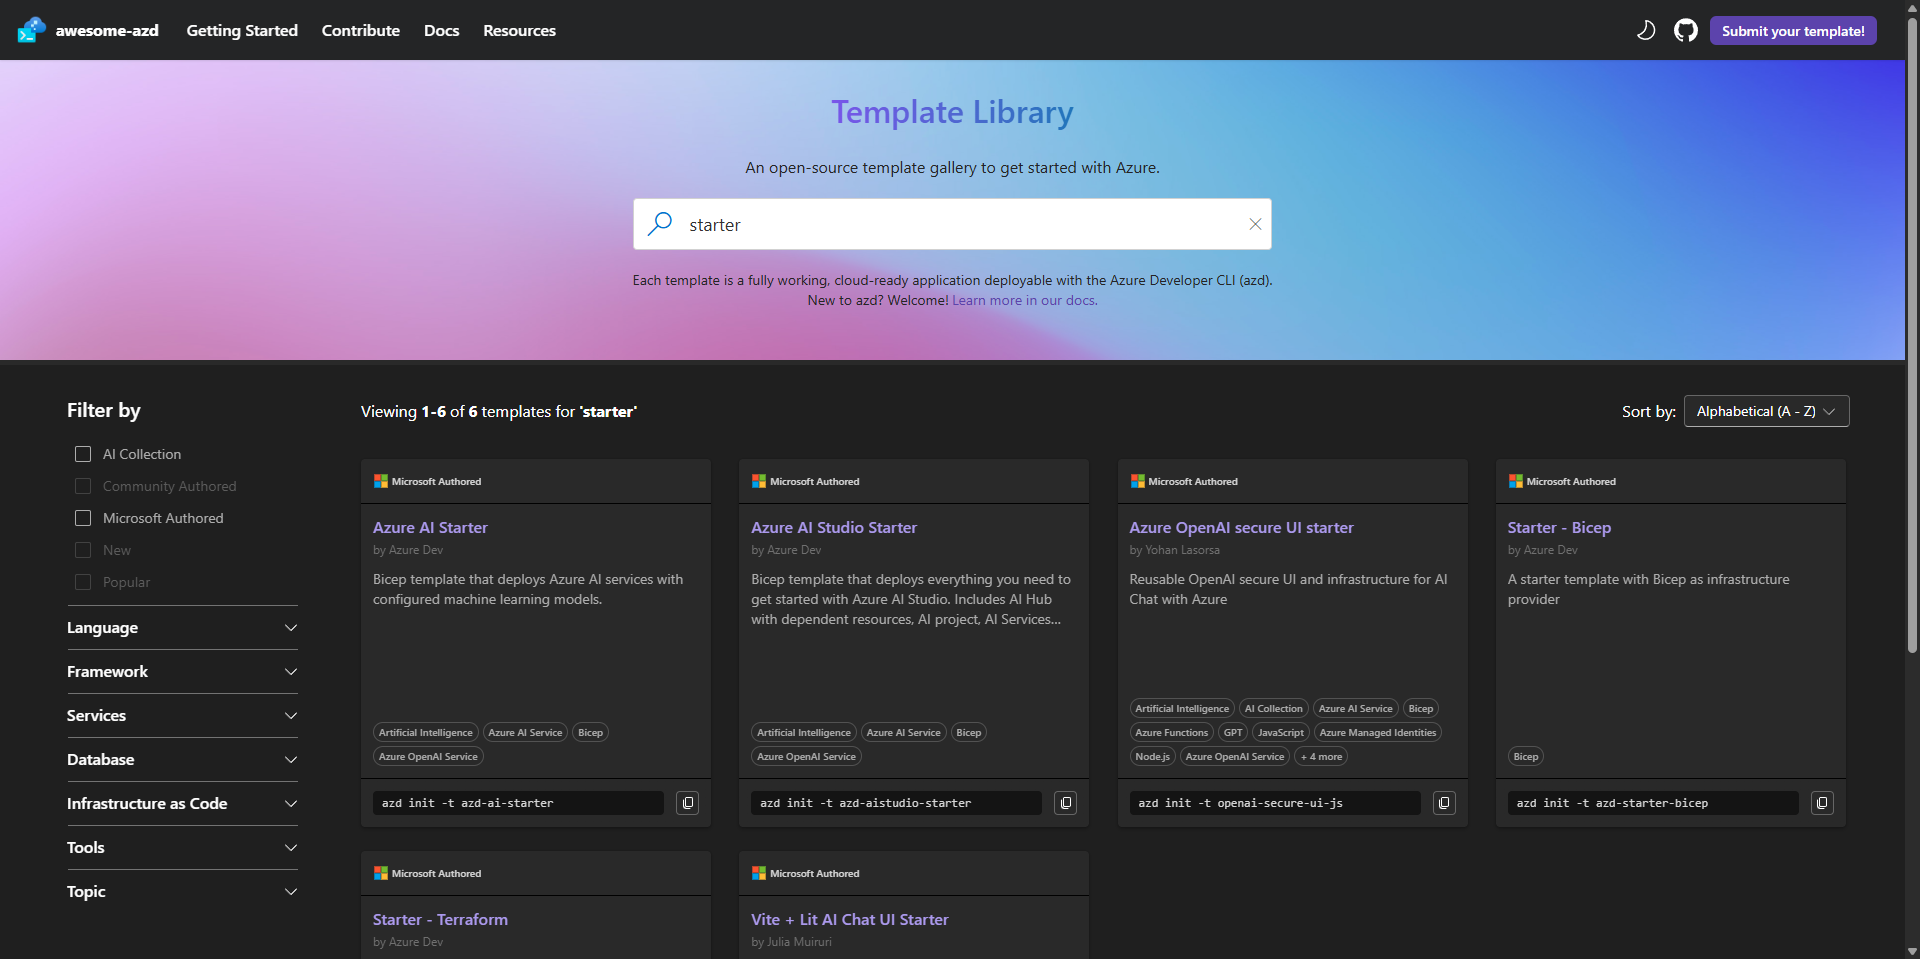
On Awesome AZD, the template we used earlier can be found by searching for “starter”. If you look closely at the screenshot, you will also see “Starter - Terraform”, which could be an interesting option for developers working with Terraform.
When clicking the title of a template, a new blade opens with more information, including usage instructions and a link to the GitHub repository.
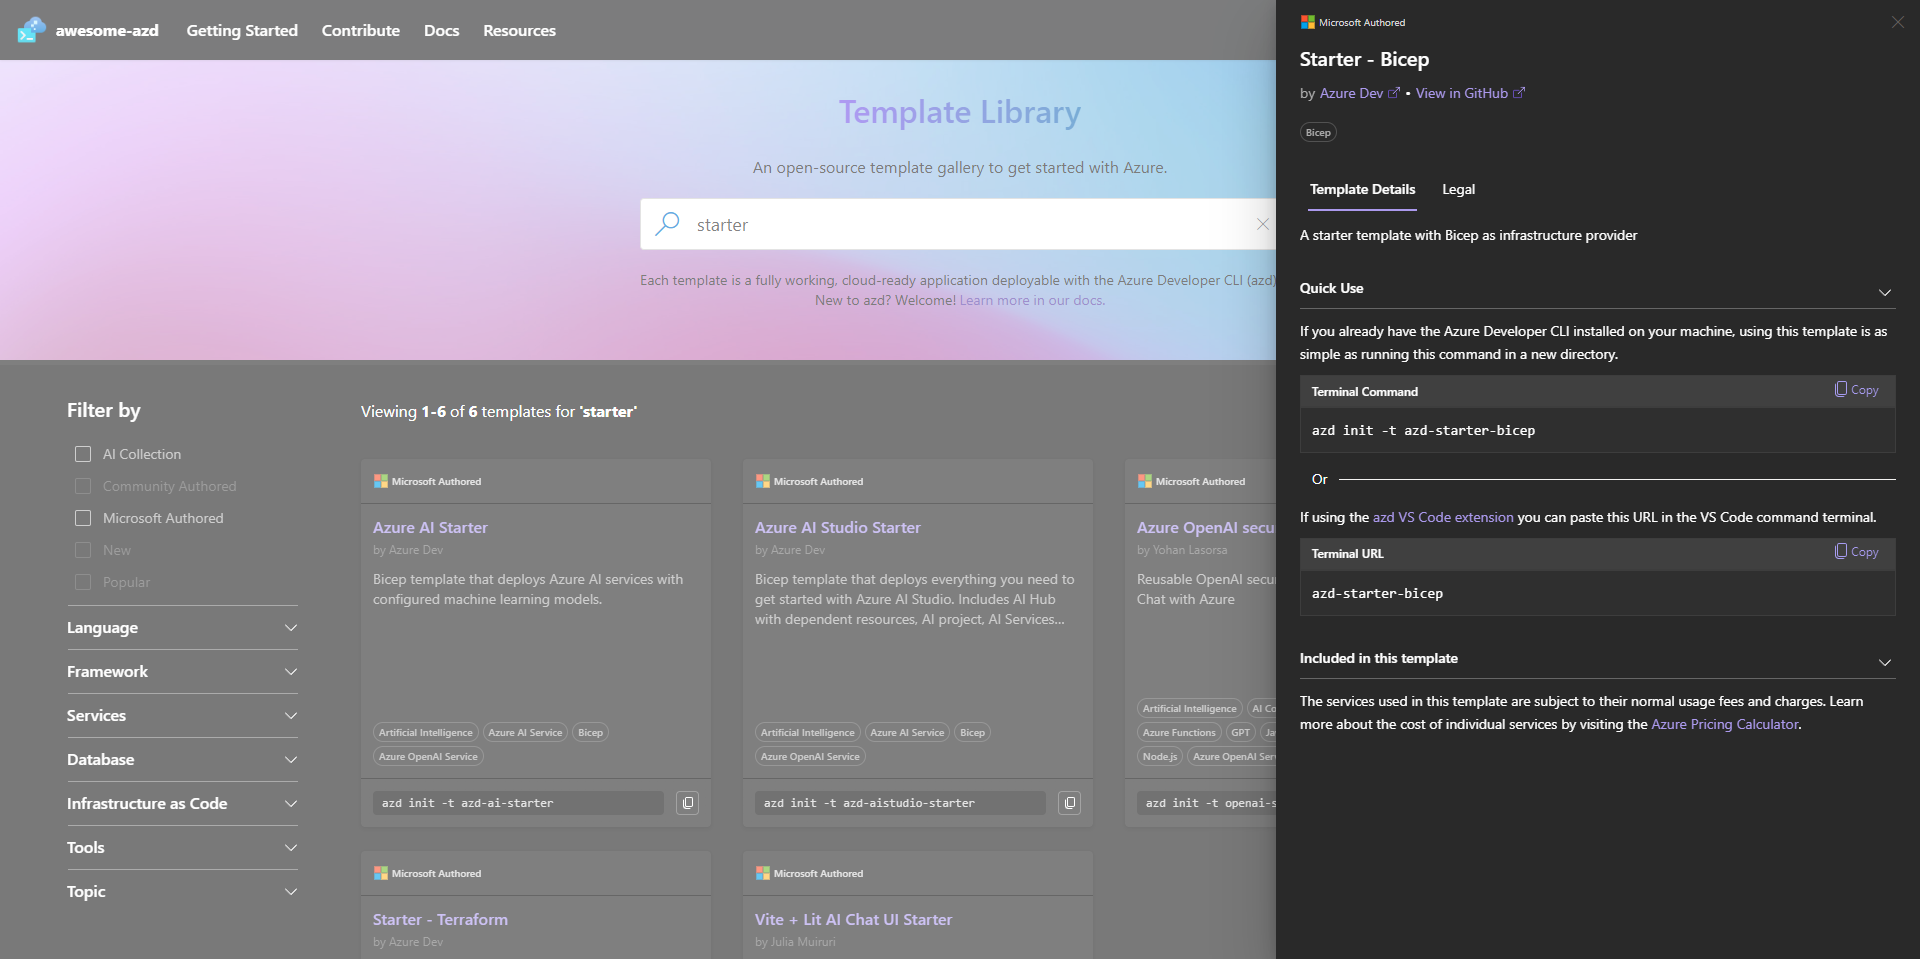
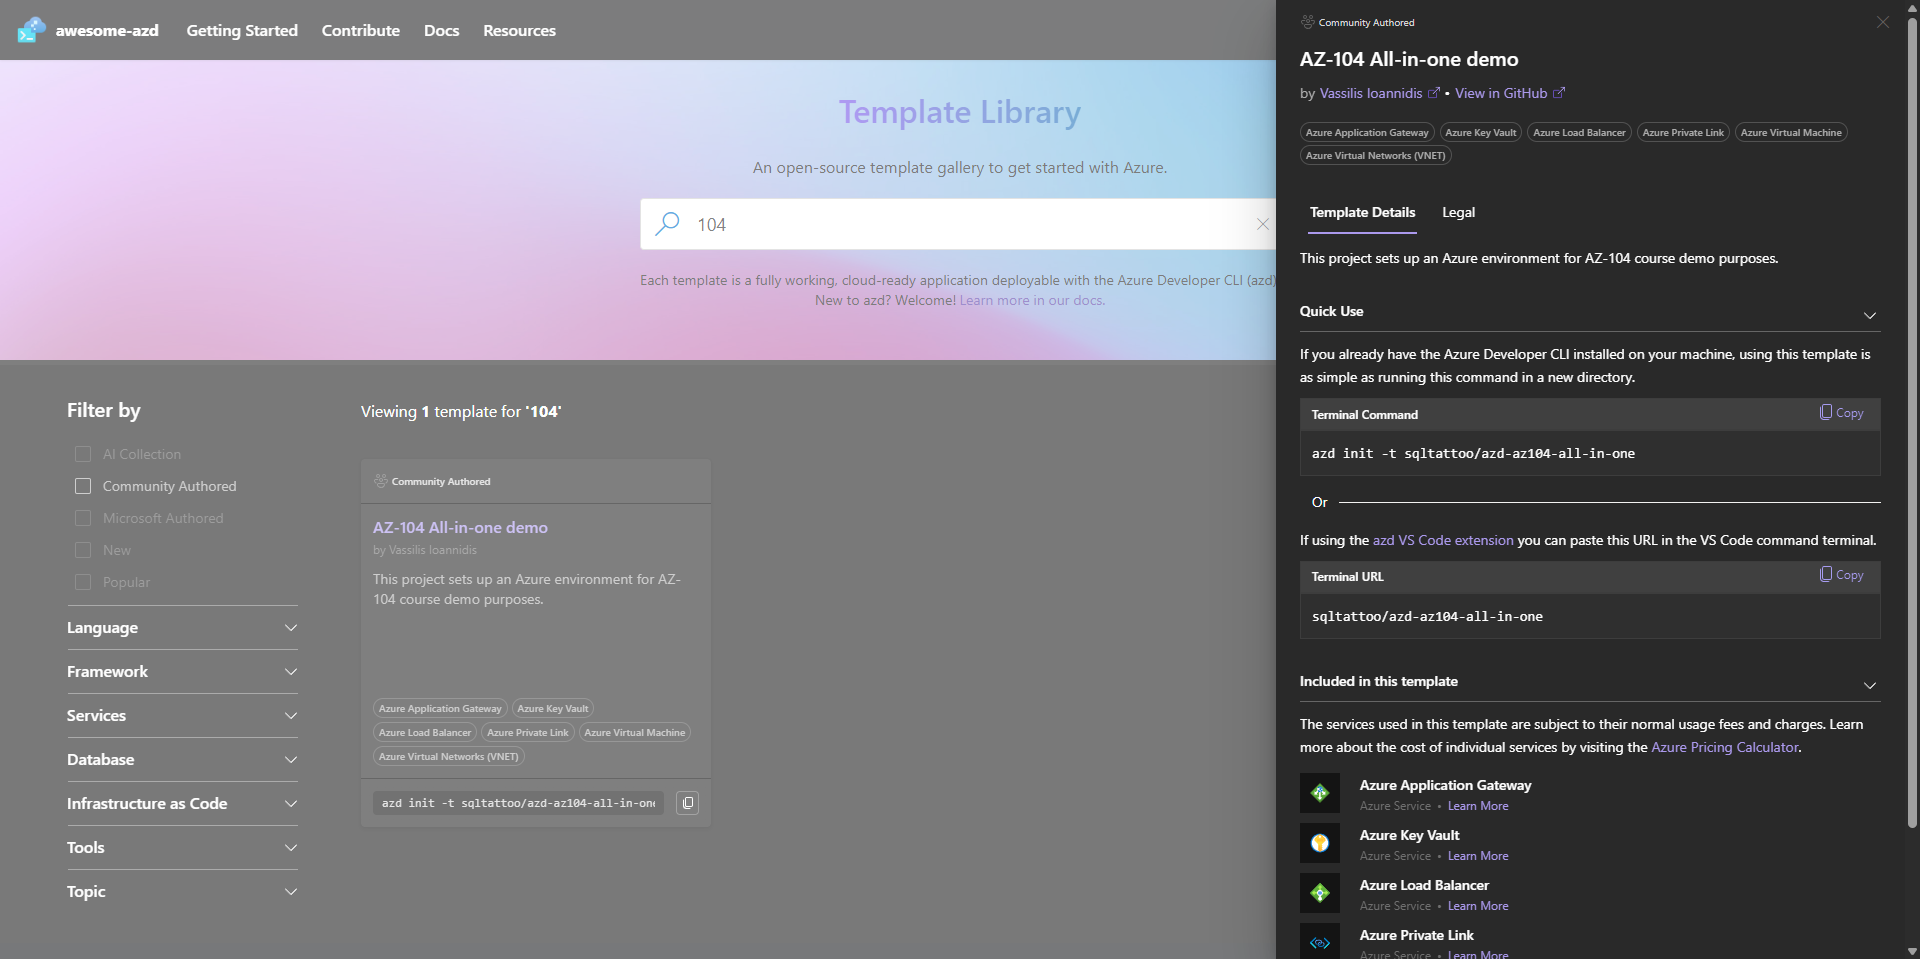
Another example is the template azd init -t sqltattoo/azd-az104-all-in-one, which can be used to create a playground to sharpen your skills and prepare for the AZ-104 certification. In this blade, under the section “Included in this template”, you will find a link to the Azure Pricing Calculator, along with a list of the Azure resources that the template provisions. This is a good example of how a template can serve many purposes. In addition, you can learn a lot by exploring the code in GitHub.
Creating your own template gallery is very simple: it’s just a webpage with links to azd template Git repositories.
It’s also possible to view templates directly from the CLI by using the azd template command. By default, only Awesome AZD is configured as a source.

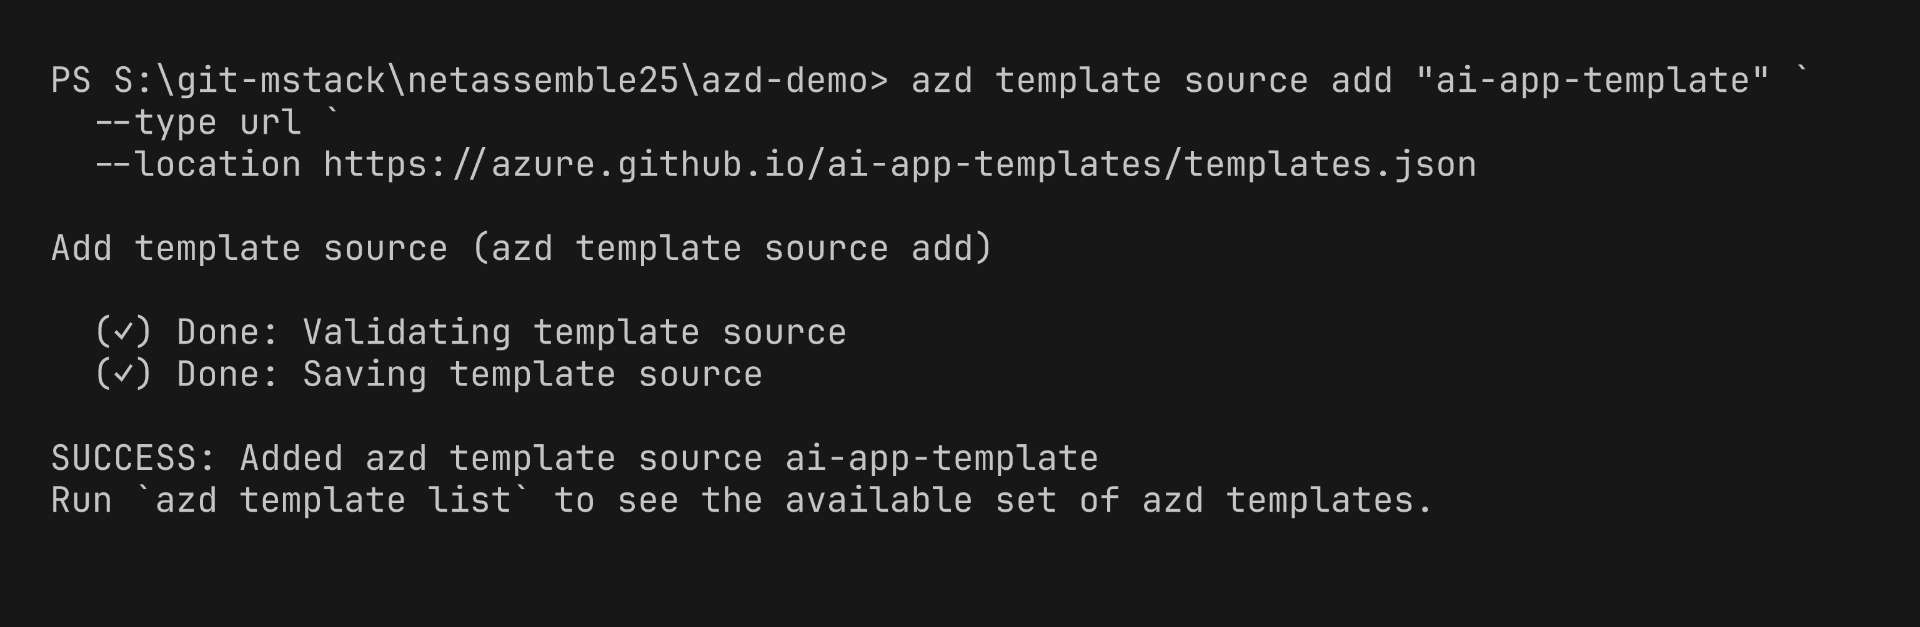
You can add the AI App Templates gallery yourself by providing its JSON file, which is available at: https://azure.github.io/ai-app-templates/templates.json
And then, when listing the sources:

By creating a similar JSON file, you can add your own template source to azd and make accessing templates directly from the CLI possible.
Which azd commands are available?
Finally, we have reached the commands section. Being a command-line tool, azd naturally provides a set of commands. During the design of azd, the team behind it analyzed the development cycle and split it into logical steps. They then defined practical, intuitive, and user-friendly commands for each of these steps, abstracting away much of the underlying complexity. This results in relatively simple commands that can perform complex tasks under the hood.
Templates make this possible. They contain a lot of metadata and configuration that the commands use to know what to provision, build, and deploy.
Let’s take a look at the most important commands:
azd init: Initializes a new template. When used without parameters, it guides you through an interactive command-line wizard, asks a series of questions, and generates a template based on your answers. When used with the--minimalparameter, it only asks for a template name and generates the same template as the default. When supplied with the--templateparameter, it uses an existing template as the starting point.azd env: Creates and manages environments. Thenewsubcommand creates a new environment, and theselectsubcommand switches to a different one. You can also set key-value pairs with this command, although many users prefer editing the environment file directly.azd pipeline: Sets up a CI/CD pipeline. This creates a simple pipeline that usesazdtasks to provision and deploy resources to Azure. It can serve as a starting point and be extended as needed.azd provision: Uses the infrastructure-as-code definitions in theinfrafolder to provision resources in Azure. It’s smart enough to detect previous deployments and can skip provisioning specific resources if they are already up to date.azd package: Packages the application(s). The packaging behavior is defined inazure.yaml. For example, for a .NET application, if the configuration specifies packaging, this might rundotnet publish. If the configuration specifies building a Docker image and aDockerfileis present, it might run a Docker build instead.azd deploy: Deploys the application to the Azure resources. This command also includes the packaging step, since you usually want to package the latest version before deployment. I often useazd packageseparately for debugging when packaging fails.azd up: A convenience command (probably familiar from other CLI tools) that packages, provisions, and deploys in one step. When there are changes to both the infrastructure code and application code, this command can replace running individual commands separately.azd monitor: Opens monitoring tools in the Azure Portal. This command requires certain Azure resources to be deployed. Without parameters or--overview, it opens a dashboard.--liveopens live metrics, and--logsopens Log Analytics.azd down: Removes all deployed Azure resources and deletes all deployments.
How do azd commands work?
When giving a public demo, it’s a good idea to set
azdto demo mode by using$env:AZD_DEMO_MODE="true". This ensures that sensitive information such as your Azure Subscription ID, which is normally shown during the command-line wizard, is hidden.
If you want to follow along, make sure that the CLI is installed. Information about how to install it can be found at Install Azure Developer CLI.
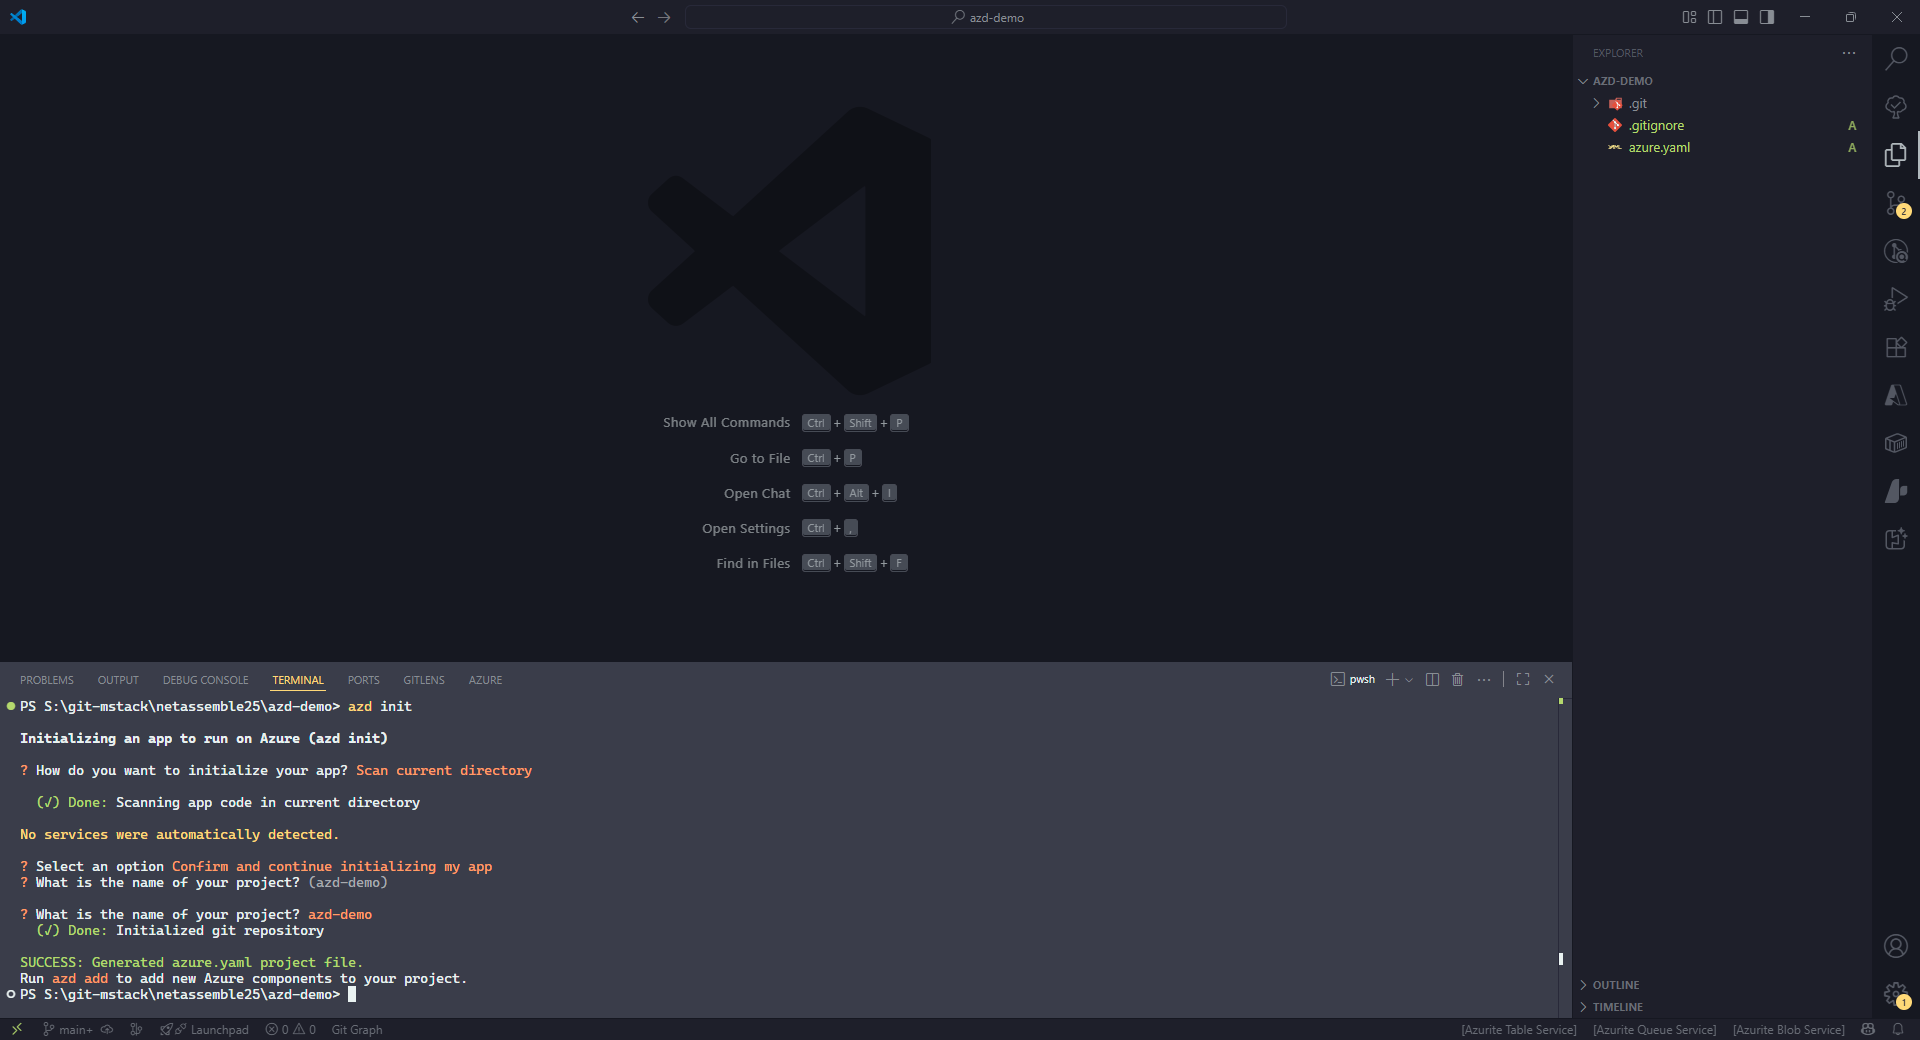
azd init
In the screenshot below, the command azd init is executed. Several questions are asked through an interactive command-line wizard, and based on your answers a template is generated. This is the bare minimum: it contains neither infrastructure code nor application code. As a result, commands like azd provision will fail with an error.
As mentioned in the previous section, if this command is executed with the --minimal flag, all questions will be skipped except for the project name, and the resulting template structure will be the same.
If we provide an actual template using the --template azd-starter-bicep parameter, the generated project is more complete and can run successfully. In the screenshot below, you can see in the Explorer view that many files are generated, including an infra folder with a main.bicep file. This file and its contents are enough for the azd provision command to succeed.

To understand this command better, we can run azd init --help, which provides the following explanation:

Let’s break this down:
- Full URI: The full URL of any Git repository. This could also be an Azure DevOps repository. Any Git repo can technically be downloaded, but if it does not follow the
azdtemplate structure, theazdcommand will not run. <owner>/<repository>: GitHub notation for repositories. This form can be used for convenience.<repository>: If only a repository name is provided,azdassumes that it is part of theazure-samplesorganization.
For example, the full URL of the azd-starter-bicep template is https://github.com/Azure-Samples/azd-starter-bicep. This is why providing only the repository name is sufficient.
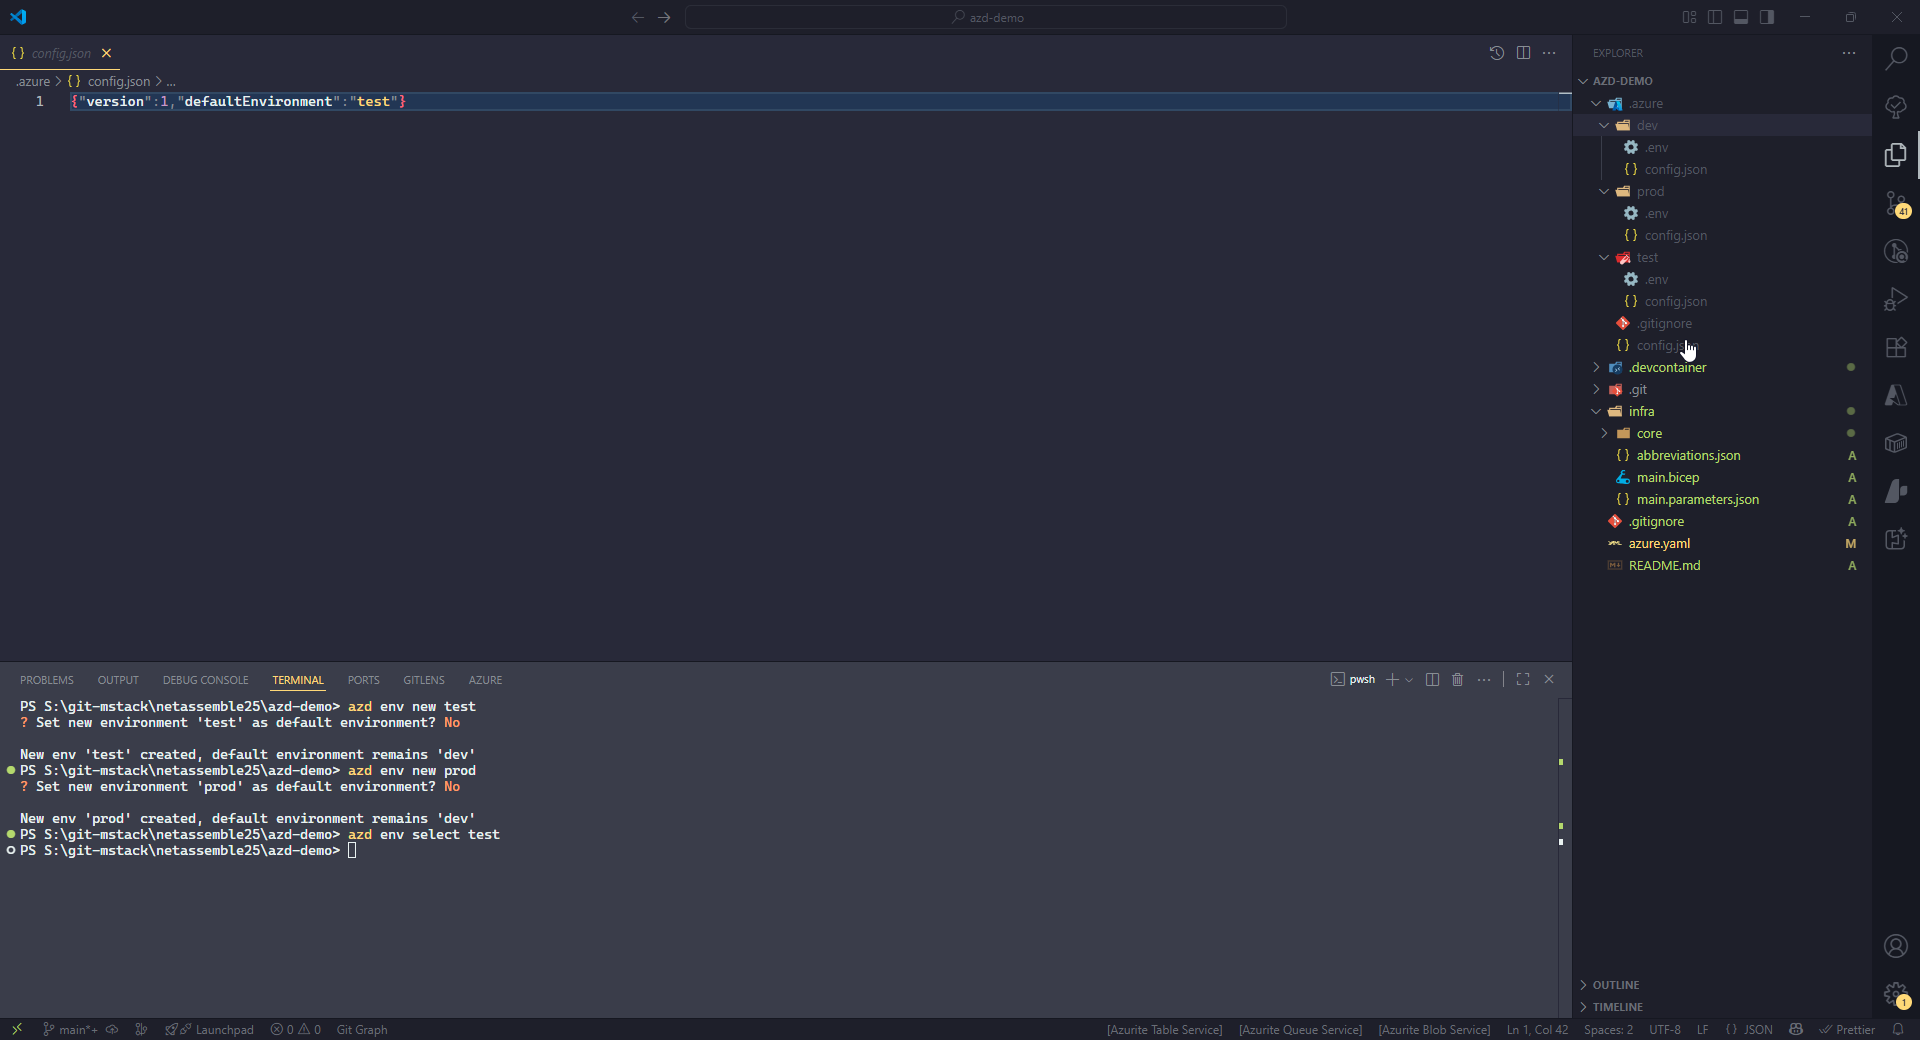
azd env
The env command is used to manage environment configurations. These configurations are primarily used for local deployments because the files are not checked into Git. When azd is run from a CI/CD pipeline, the environment configurations are usually defined within the CI/CD platform itself.
Inside the .azure folder, you’ll typically find subfolders for each environment, such as dev, test, and prod. Each of these contains two files: .env and config.json.
.envis used for the environment configuration.config.jsonis used internally byazd.
As shown in the screenshot below, config.json contains the defaultEnvironment, which is set using the azd env select command. This setting tells the CLI which environment to use when executing commands.
azd pipeline
The pipeline command is used to generate a CI/CD pipeline. The actual command is azd pipeline config, which starts an interactive command-line wizard. Based on your answers, a pipeline YAML file is generated.
In the screenshot below, you can see all the questions asked during setup. As a result of completing the wizard, a .github folder is created containing the generated pipeline YAML file. Because the question “Would you like to commit and push your local changes to start the configured CI pipeline?” was answered with “Yes”, the changes were pushed to the Git repository, which automatically triggered the pipeline run.
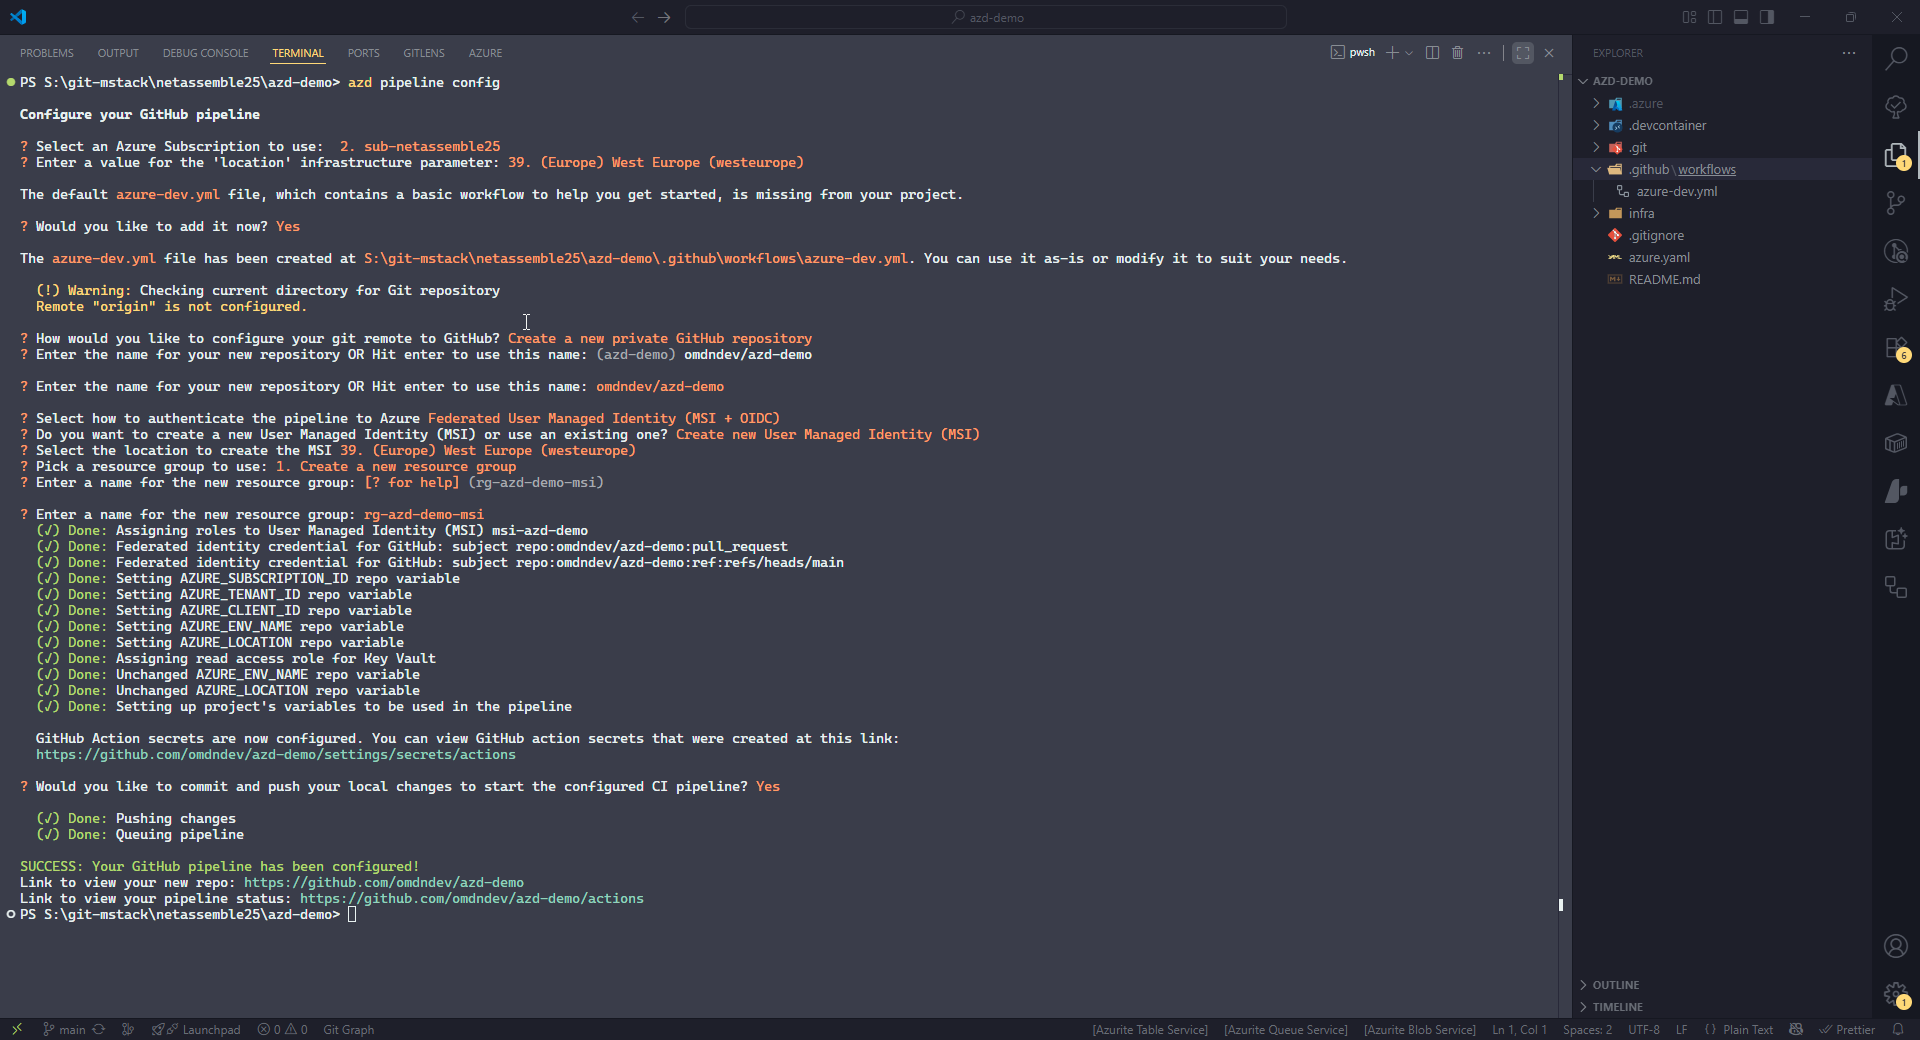
The generated pipeline is intentionally simple. It serves as a starting point for implementing best practices. Keep in mind that when testing this pipeline, a Managed Identity is created and used for provisioning and deployment. When azd is used from a local machine, it instead uses the credentials of the logged-in user.
1
2
3
4
5
6
7
8
9
10
11
12
13
14
15
16
17
18
19
20
21
22
23
24
25
26
27
28
29
30
31
32
33
34
35
36
37
38
39
40
41
42
# Run when commits are pushed to main
on:
  workflow_dispatch:
  push:
    # Run when commits are pushed to mainline branch (main or master)
    # Set this to the mainline branch you are using
    branches:
      - main

# Set up permissions for deploying with secretless Azure federated credentials
# https://learn.microsoft.com/en-us/azure/developer/github/connect-from-azure?tabs=azure-portal%2Clinux#set-up-azure-login-with-openid-connect-authentication
permissions:
  id-token: write
  contents: read

jobs:
  build:
    runs-on: ubuntu-latest
    env:
      AZURE_CLIENT_ID: ${{ vars.AZURE_CLIENT_ID }}
      AZURE_TENANT_ID: ${{ vars.AZURE_TENANT_ID }}
      AZURE_SUBSCRIPTION_ID: ${{ vars.AZURE_SUBSCRIPTION_ID }}
      AZURE_ENV_NAME: ${{ vars.AZURE_ENV_NAME }}
      AZURE_LOCATION: ${{ vars.AZURE_LOCATION }}
    steps:
      - name: Checkout
        uses: actions/checkout@v4
      - name: Install azd
        uses: Azure/setup-azd@v2
      - name: Log in with Azure (Federated Credentials)
        run: |
          azd auth login `
            --client-id "$Env:AZURE_CLIENT_ID" `
            --federated-credential-provider "github" `
            --tenant-id "$Env:AZURE_TENANT_ID"
        shell: pwsh

      - name: Provision Infrastructure
        run: azd provision --no-prompt

      - name: Deploy Application
        run: azd deploy --no-prompt
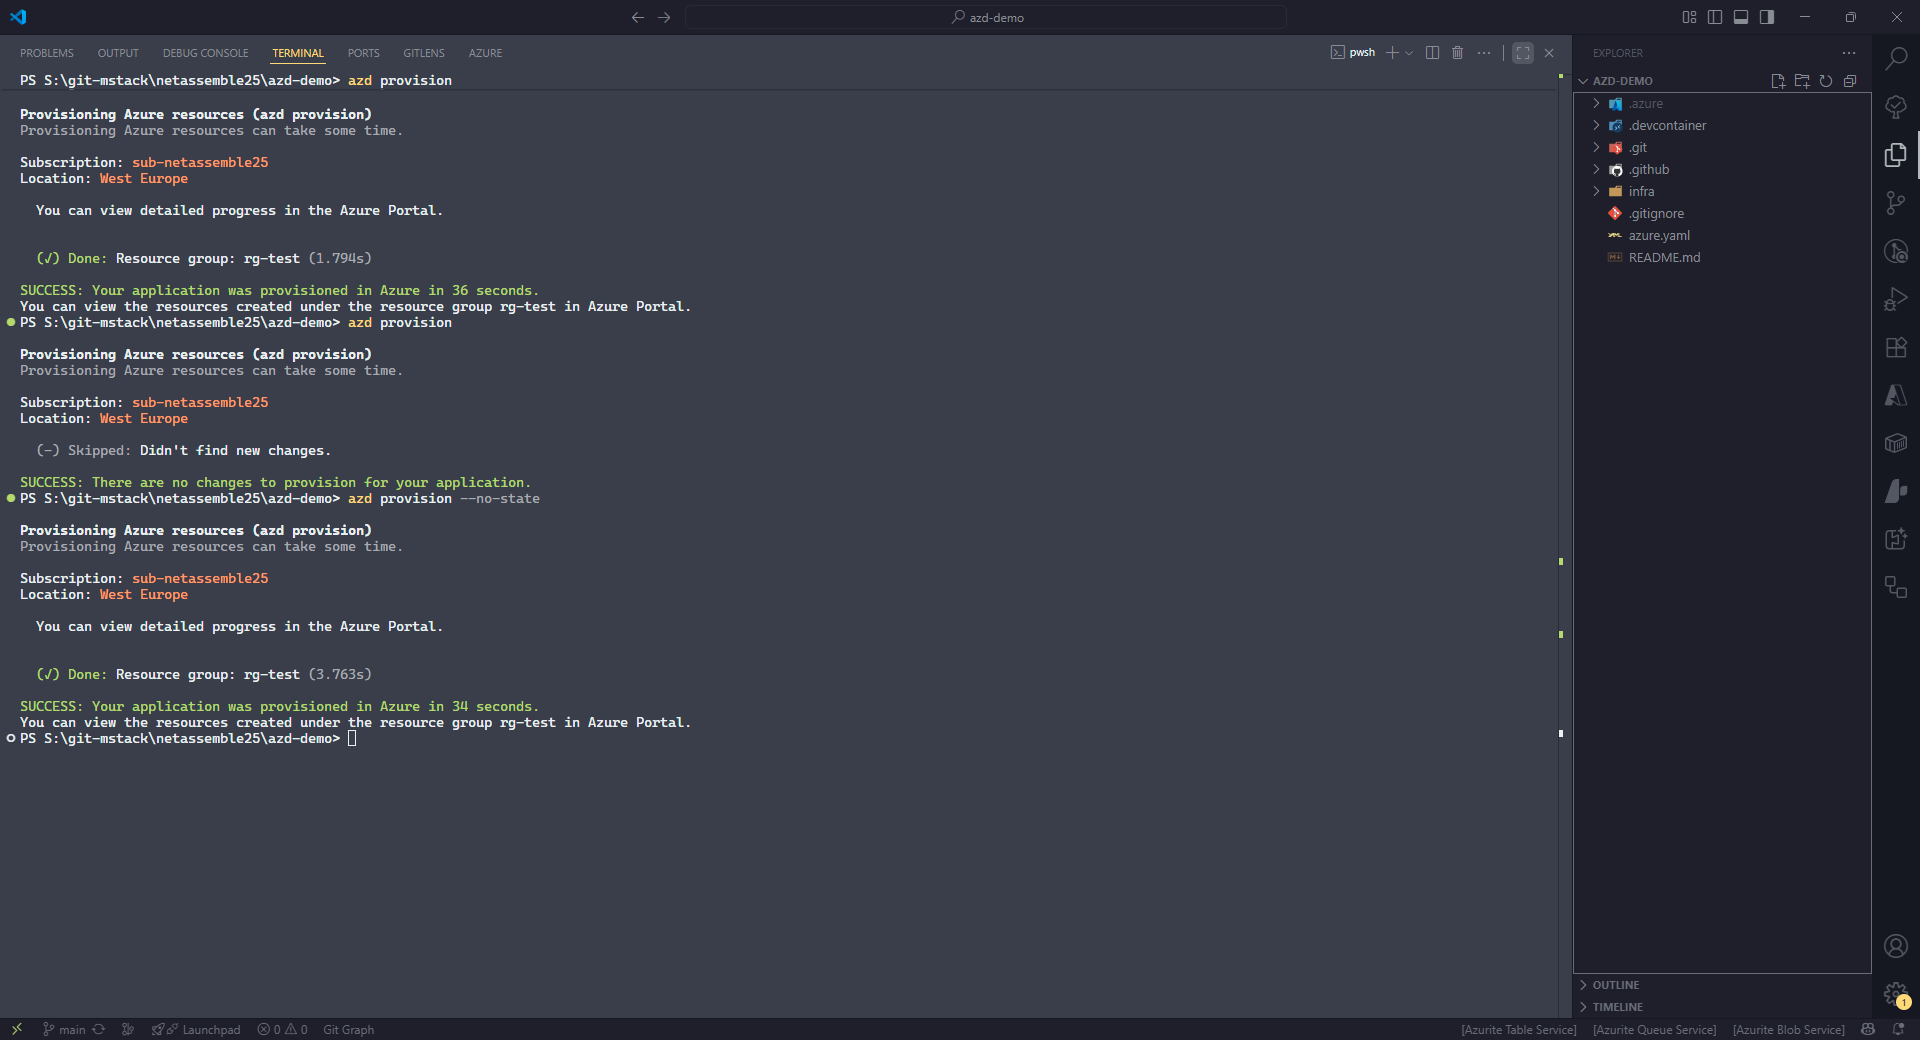
azd provision
This is the first command that requires code to execute successfully. The provision command depends on infrastructure-as-code definitions located in the infra folder. In my case, it needs the main.bicep file because I am using Bicep.
Each time the command runs, it checks the deployment state in Azure and only redeploys resources when it detects changes. However, it does not detect drift if the environment is manually deleted, since the deployment state in Azure will no longer exist.
When that happens, you can use the --no-state parameter to force a full redeployment. The screenshot below shows an example of this behavior. When executed the second time, azd provision skips provisioning since nothing has changed, but when run with --no-state, it forces a new deployment.
The default main.bicep file deployed by azd creates only a Resource Group. We can modify it slightly to also deploy an App Service Plan and an App Service.
Because Azure Verified Modules are written in Bicep, they work seamlessly with azd, just like any other Bicep module. Below is a fully modified main.bicep.
1
2
3
4
5
6
7
8
9
10
11
12
13
14
15
16
17
18
19
20
21
22
23
24
25
26
27
28
29
30
31
32
33
34
35
36
37
38
39
40
41
42
43
44
45
46
47
48
49
50
51
52
53
54
55
56
57
58
59
60
61
62
63
64
65
66
67
68
69
70
71
72
73
74
75
76
77
78
79
80
81
82
83
84
85
86
87
88
89
targetScope = 'subscription'

// The main bicep module to provision Azure resources.
// For a more complete walkthrough to understand how this file works with azd,
// see https://learn.microsoft.com/en-us/azure/developer/azure-developer-cli/make-azd-compatible?pivots=azd-create

@minLength(1)
@maxLength(64)
@description('Name of the the environment which is used to generate a short unique hash used in all resources.')
param environmentName string

@minLength(1)
@description('Primary location for all resources')
param location string

// Optional parameters to override the default azd resource naming conventions.
// Add the following to main.parameters.json to provide values:
// "resourceGroupName": {
//      "value": "myGroupName"
// }
param resourceGroupName string = ''

var abbrs = loadJsonContent('./abbreviations.json')

// tags that should be applied to all resources.
var tags = {
  // Tag all resources with the environment name.
  'azd-env-name': environmentName
}

// Generate a unique token to be used in naming resources.
// Remove linter suppression after using.
#disable-next-line no-unused-vars
var resourceToken = toLower(uniqueString(subscription().id, environmentName, location))

// Name of the service defined in azure.yaml
// A tag named azd-service-name with this value should be applied to the service host resource, such as:
//   Microsoft.Web/sites for appservice, function
// Example usage:
//   tags: union(tags, { 'azd-service-name': apiServiceName })
#disable-next-line no-unused-vars
var apiServiceName = 'python-api'

// Organize resources in a resource group
resource rg 'Microsoft.Resources/resourceGroups@2021-04-01' = {
  name: !empty(resourceGroupName) ? resourceGroupName : '${abbrs.resourcesResourceGroups}${environmentName}'
  location: location
  tags: tags
}

// Add resources to be provisioned below.
// A full example that leverages azd bicep modules can be seen in the todo-python-mongo template:
// https://github.com/Azure-Samples/todo-python-mongo/tree/main/infra

module serverfarm 'br/public:avm/res/web/serverfarm:0.5.0' = {
  scope: resourceGroup(rg.name)
  name: 'appPlanDeployment'
  params: {
    name: 'plan-${resourceToken}'
    skuName: 'F1'
    tags: tags
  }
}

module site 'br/public:avm/res/web/site:0.19.3' = {
  scope: resourceGroup(rg.name)
  name: 'appServiceDeployment'
  params: {
    kind: 'app'
    name: 'app-${resourceToken}'
    serverFarmResourceId: serverfarm.outputs.resourceId
    siteConfig: {
      alwaysOn: false
    }
    tags: tags
  }
}


// Add outputs from the deployment here, if needed.
//
// This allows the outputs to be referenced by other bicep deployments in the deployment pipeline,
// or by the local machine as a way to reference created resources in Azure for local development.
// Secrets should not be added here.
//
// Outputs are automatically saved in the local azd environment .env file.
// To see these outputs, run `azd env get-values`,  or `azd env get-values --output json` for json output.
output AZURE_LOCATION string = location
output AZURE_TENANT_ID string = tenant().tenantId
azd package
The package command builds the application code and creates a deployable artifact. It doesn’t have to package just one application; it can build and package multiple applications at once, depending on the configuration defined in the azure.yaml file. Let’s go through the steps.
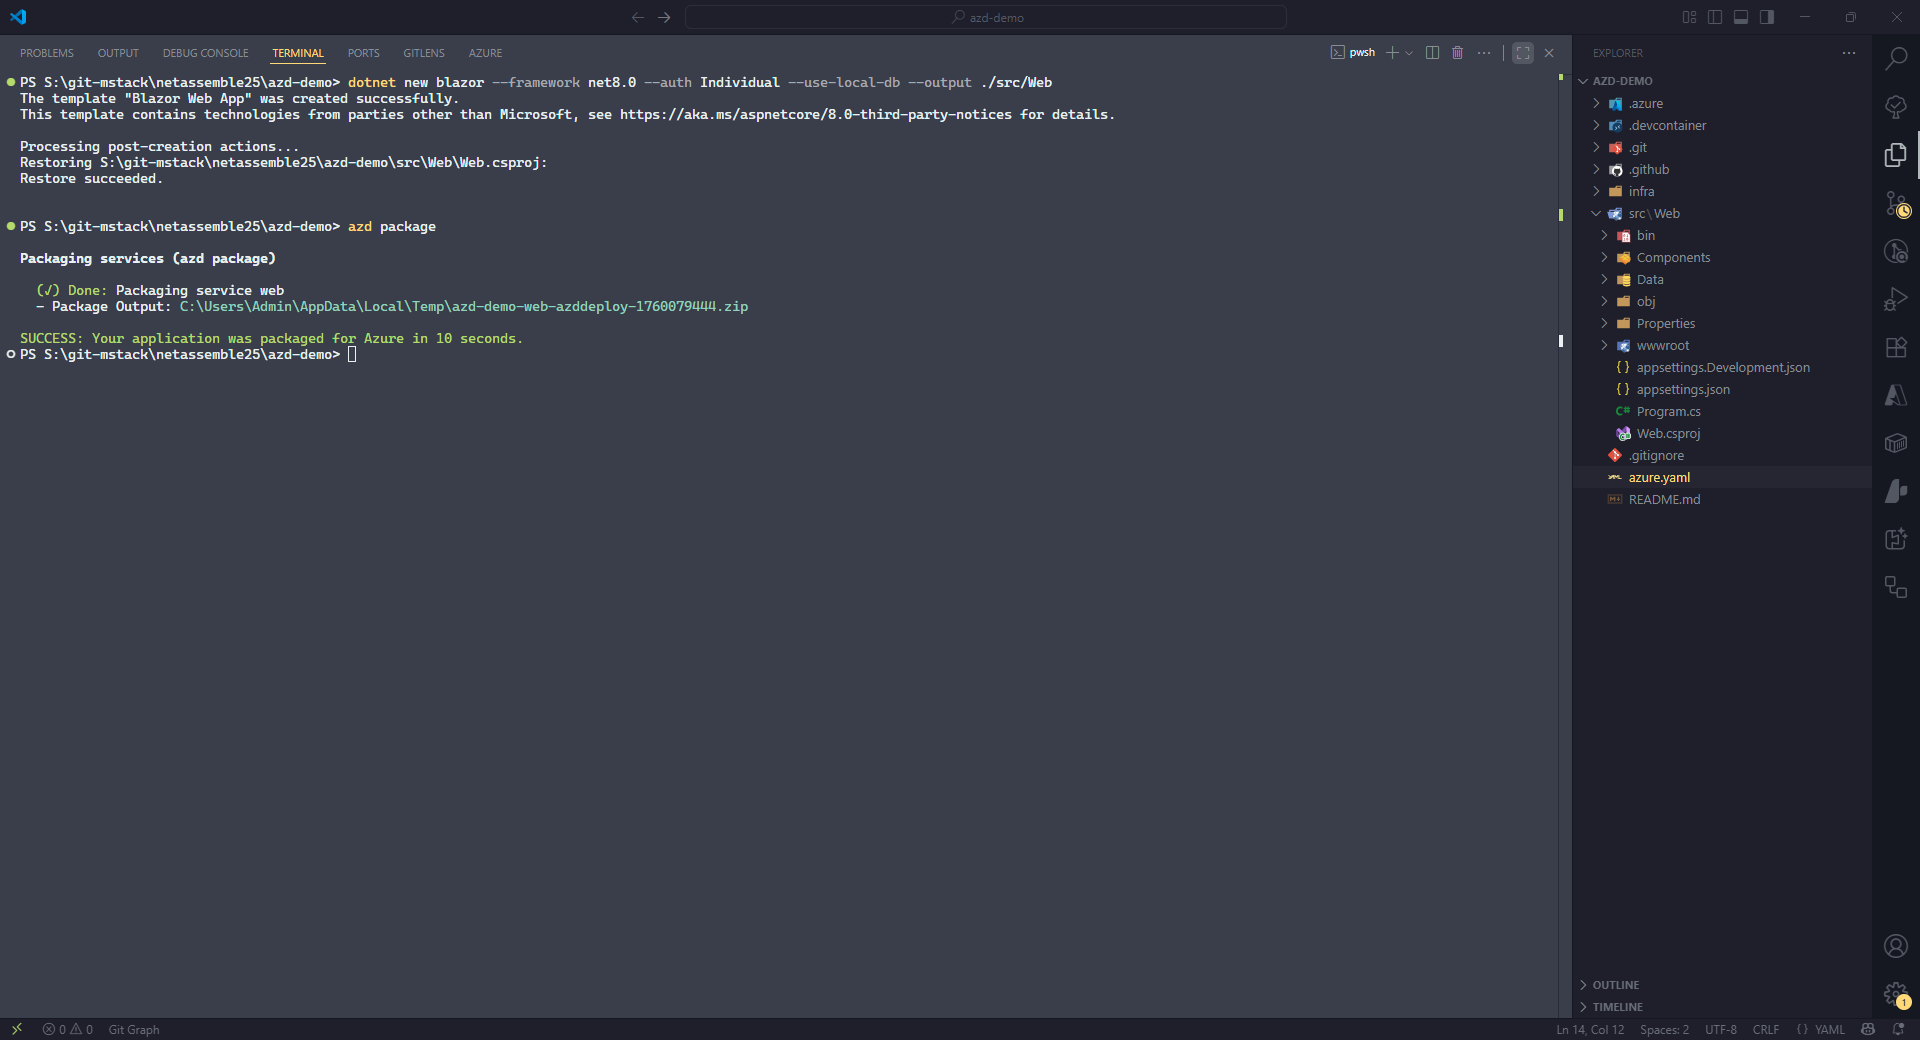
To use the azd package command, we first need an application. We’ll create a Blazor Web App using the .NET CLI. An important part of this command is the value of the --output parameter, which specifies that the C# project will be created inside the src folder, in a subfolder named Web.
Using a subfolder under src makes it easy to add more applications later. For example, if you need to add a backend service, it could be created in ./src/Backend.
1
dotnet new blazor --framework net8.0 --auth Individual --use-local-db --output ./src/Web
Creating the application is not enough, because the azd package command needs to know how to package it. As mentioned previously, this configuration is defined in the azure.yaml file.
In the example below, under the services section, we define a service named web. You could name this anything (for example, frontend), but it’s important because this name links the application to its corresponding Azure resource during deployment. Under this section, we configure the language, project path, and target host.
1
2
3
4
5
6
name: azd-demo
services:
  web:
    language: dotnet
    project: ./src/Web
    host: appservice
Running the azd package command now creates a deployable artifact successfully.
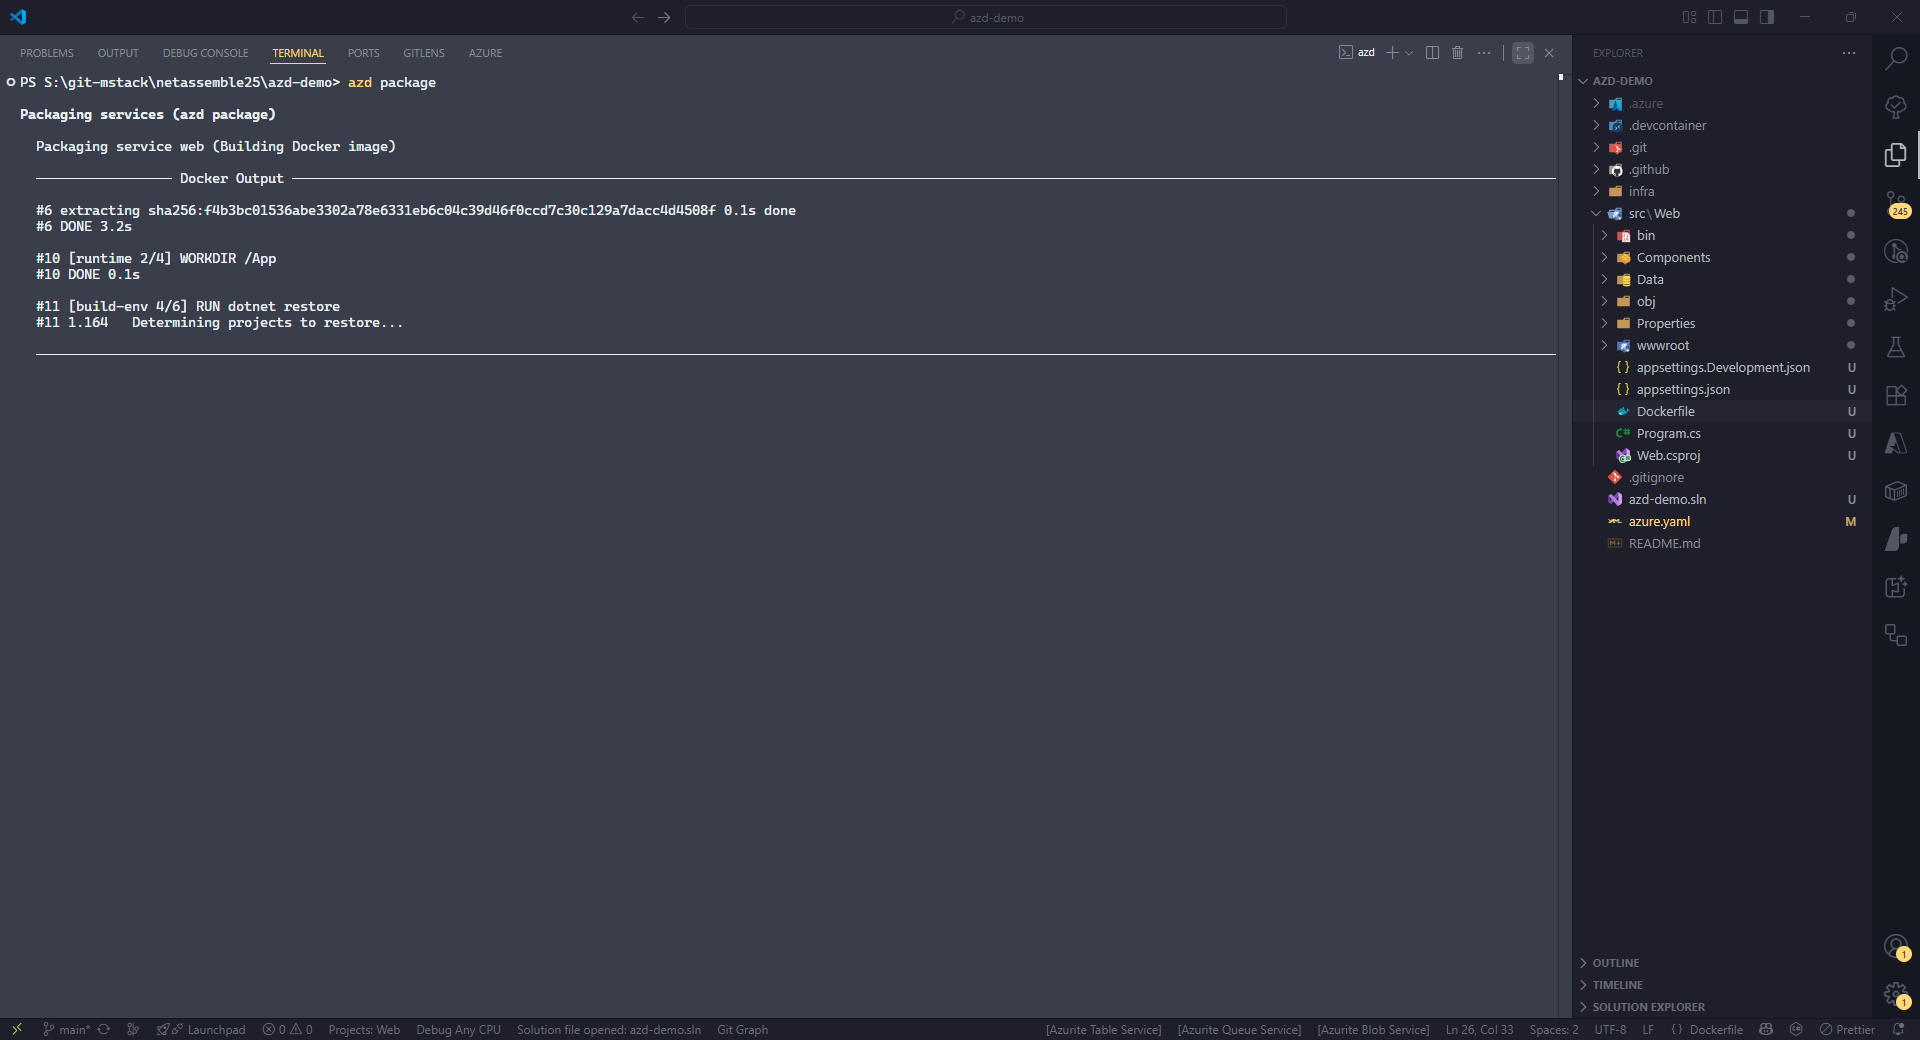
Another option is to use azd package to build a Docker image. The command itself does not change, but the configuration in azure.yaml does, because we need to specify that a Docker image should be created.
To make this work, we need to add a Dockerfile in the ./src/Web folder:
1
2
3
4
5
6
7
8
9
10
11
12
13
14
15
16
17
18
19
20
21
22
23
24
25
26
# Build stage
FROM mcr.microsoft.com/dotnet/sdk:8.0 AS build-env
WORKDIR /App

# Copy csproj and restore as distinct layers
COPY *.csproj ./
RUN dotnet restore

# Copy everything else and build
COPY . ./
RUN dotnet publish -c Release -o out

# Runtime stage
FROM mcr.microsoft.com/dotnet/aspnet:8.0-alpine AS runtime
WORKDIR /App

COPY --from=build-env /App/out .

ENV ASPNETCORE_URLS=http://+:8080
EXPOSE 8080

# Security: run as non-root user
RUN adduser --disabled-password --home /app appuser && chown -R appuser /App
USER appuser

ENTRYPOINT ["dotnet", "Web.dll"]
After creating the Dockerfile, we need to adjust the configuration in azure.yaml. The host value is changed from appservice to containerapp, since App Service hosting in azd does not support Dockerfiles.
1
2
3
4
5
6
7
8
9
name: azd-demo
services:
  web:
    language: dotnet
    project: ./src/Web
    host: containerapp
    docker:
      path: ./Dockerfile
      context: .
When we run the azd package command again, it uses Docker to build the image. You can see this in the next two screenshots: the first during the build, and the second after the build completes.
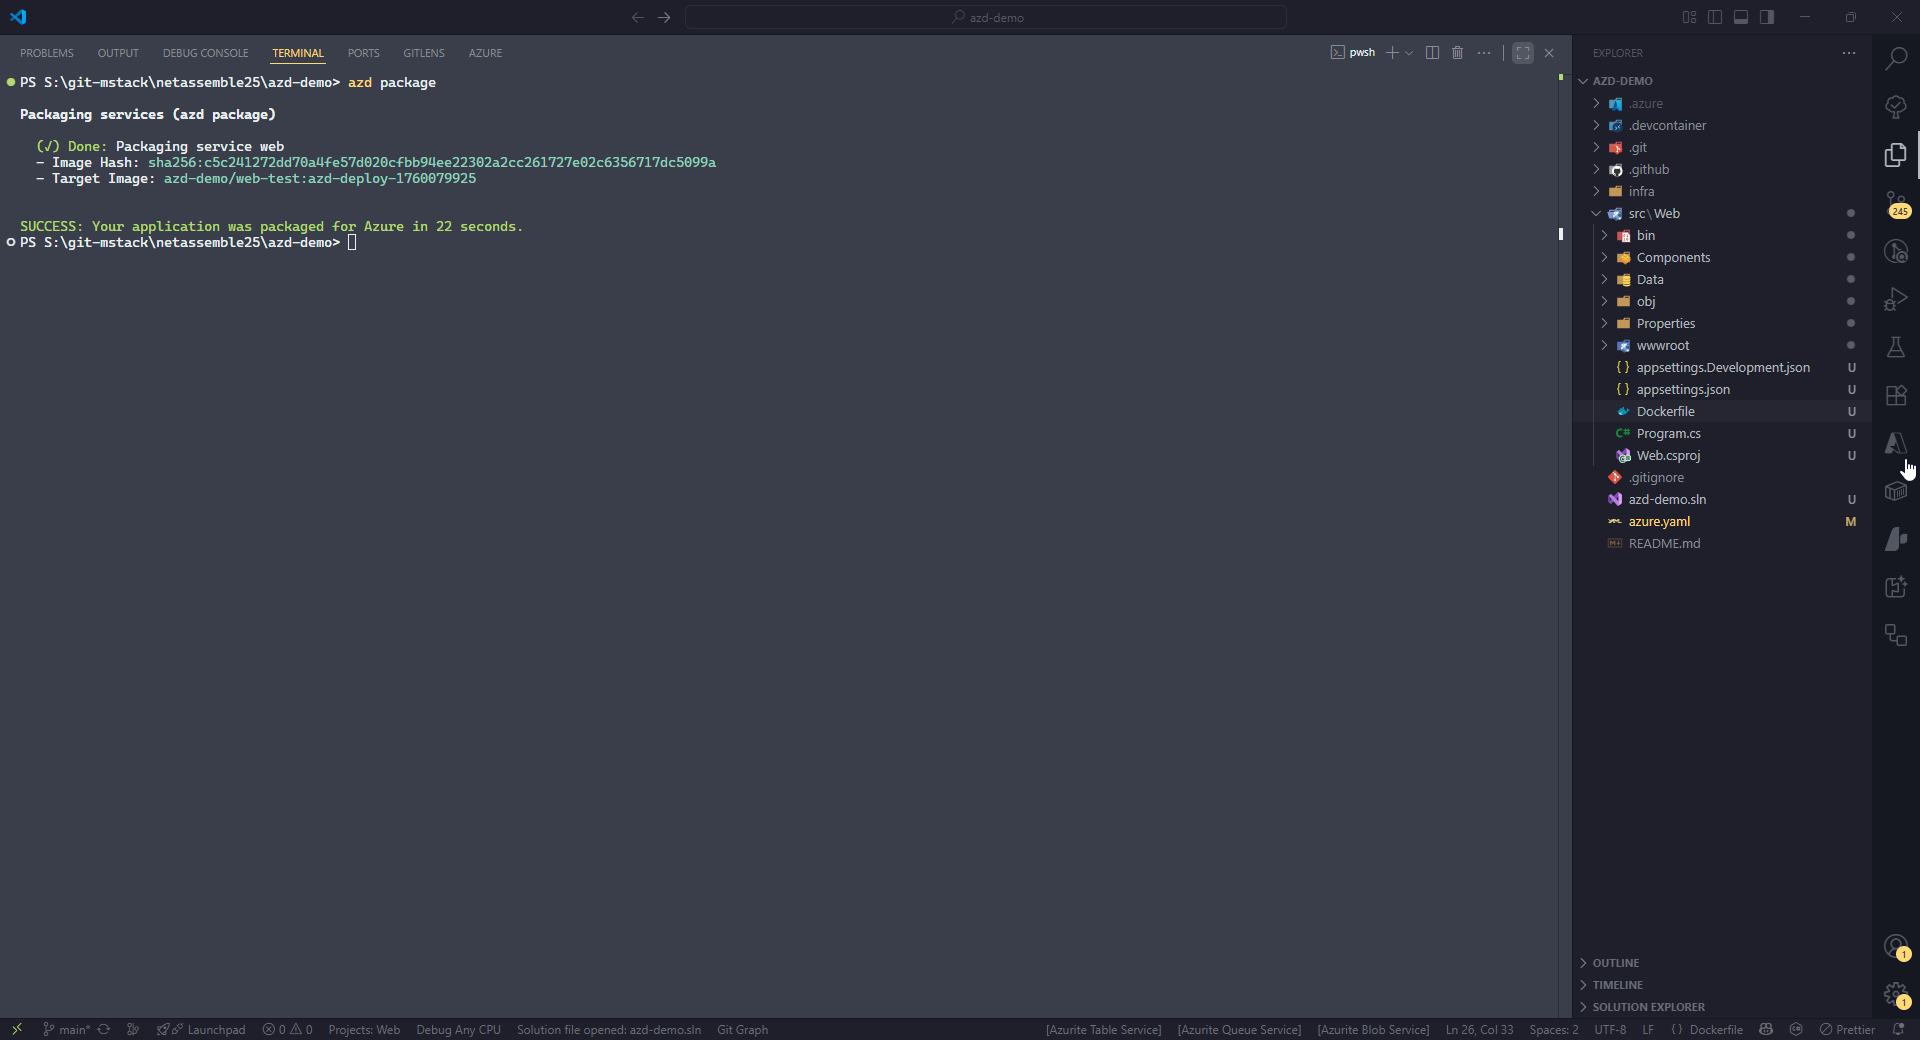
This example illustrates how azd package can produce different types of deployment artifacts. If you are following along with this demo, you can now revert your azure.yaml file to its previous state.
azd deploy
The azd deploy command is used to deploy the packaged artifact to the provisioned Azure resources. It is a convenience command, as it first packages the application and then deploys it automatically. This fits well into a developer’s workflow, since it would not be an ideal experience to have to run azd package and azd deploy separately each time.
I usually use the azd package command for debugging when packaging fails. When packaging completes successfully, I use azd deploy instead, since it already includes the packaging step.
During the provisioning step, we added Azure resources to infra/main.bicep. During the packaging step, we added application code in the ./src/Web folder. However, we have not yet linked them, so azd doesn’t know how to deploy the application to the App Service. To fix this, we need to make a small change to main.bicep.
We’ll change the following line:
1
var apiServiceName = 'python-api'
to:
1
var webServiceName = 'web'
Then, in the Azure Verified Module for App Service, update the tags line from:
1
tags: tags
to:
1
tags: union(tags, { 'azd-service-name': webServiceName })
This sets a tag on the App Service resource named azd-service-name with the value web, which matches the service name defined in azure.yaml.
Because we changed the infrastructure code, we need to run azd provision again so that the new tag is applied to the App Service.
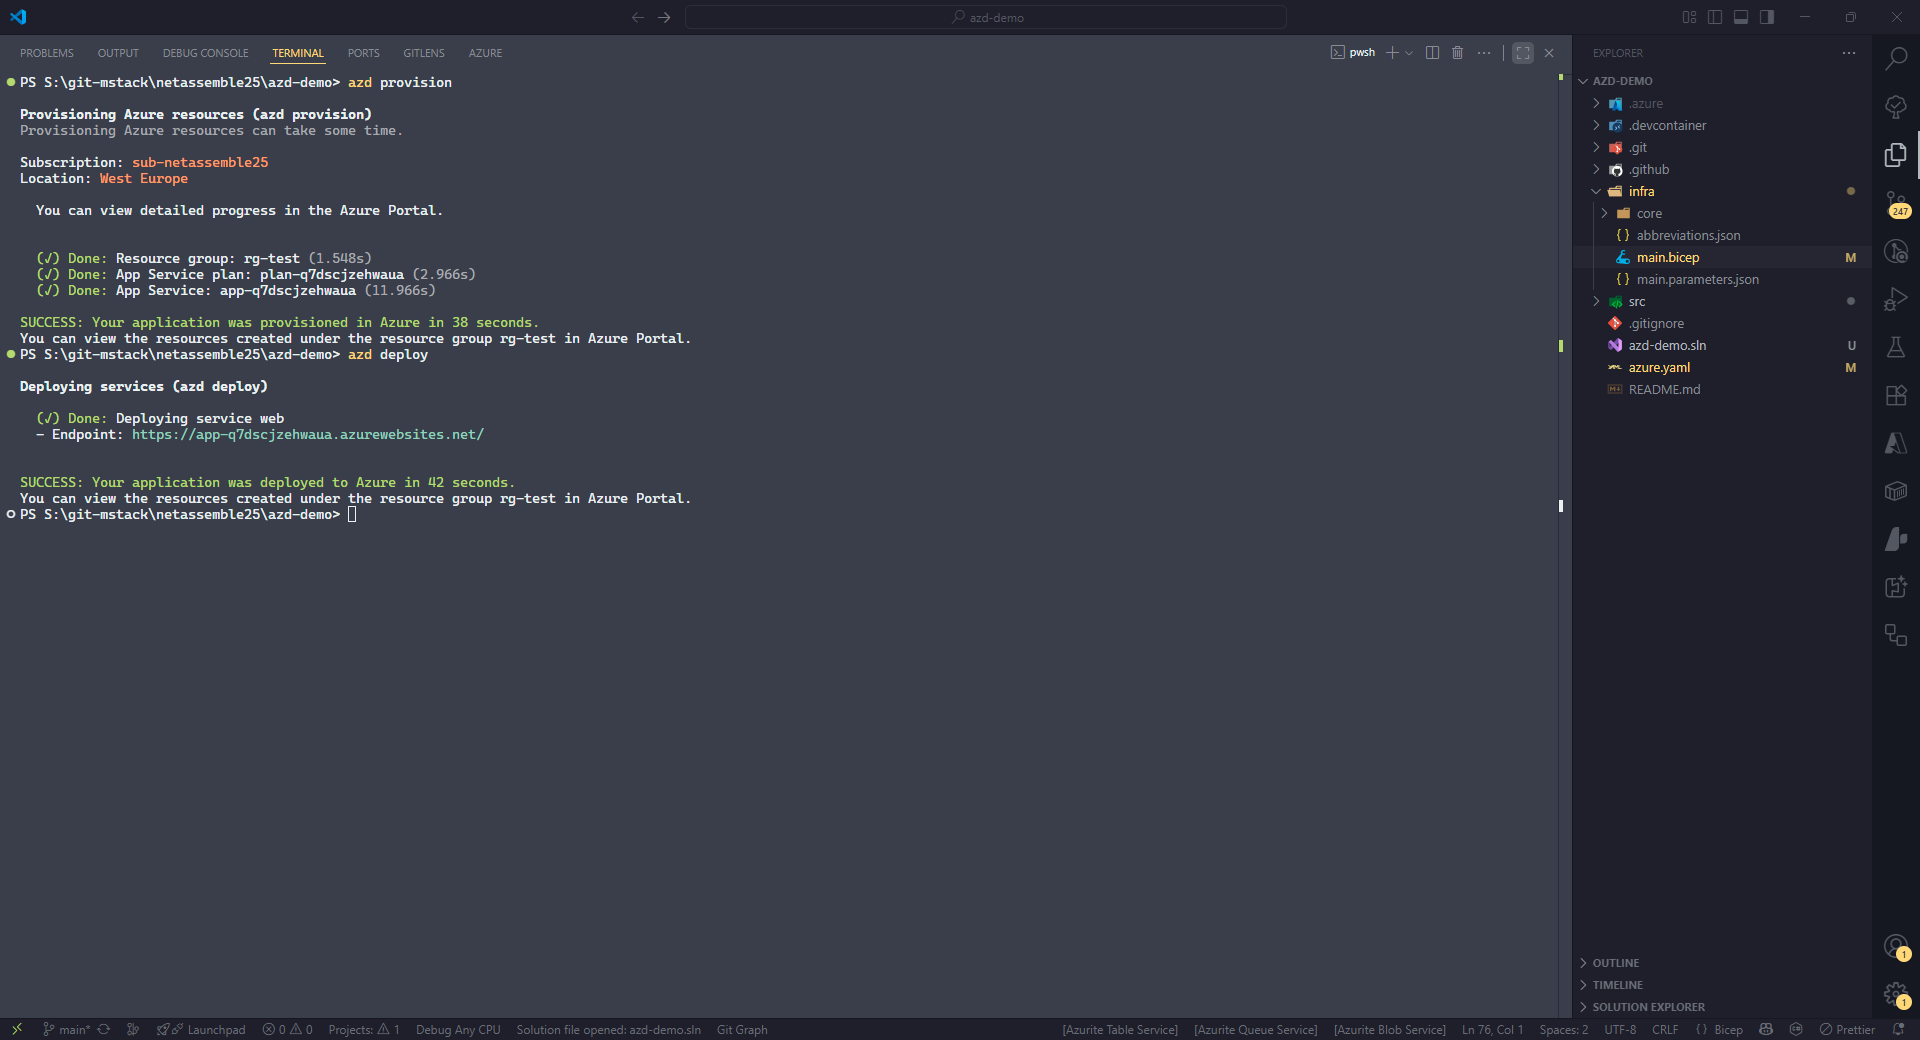
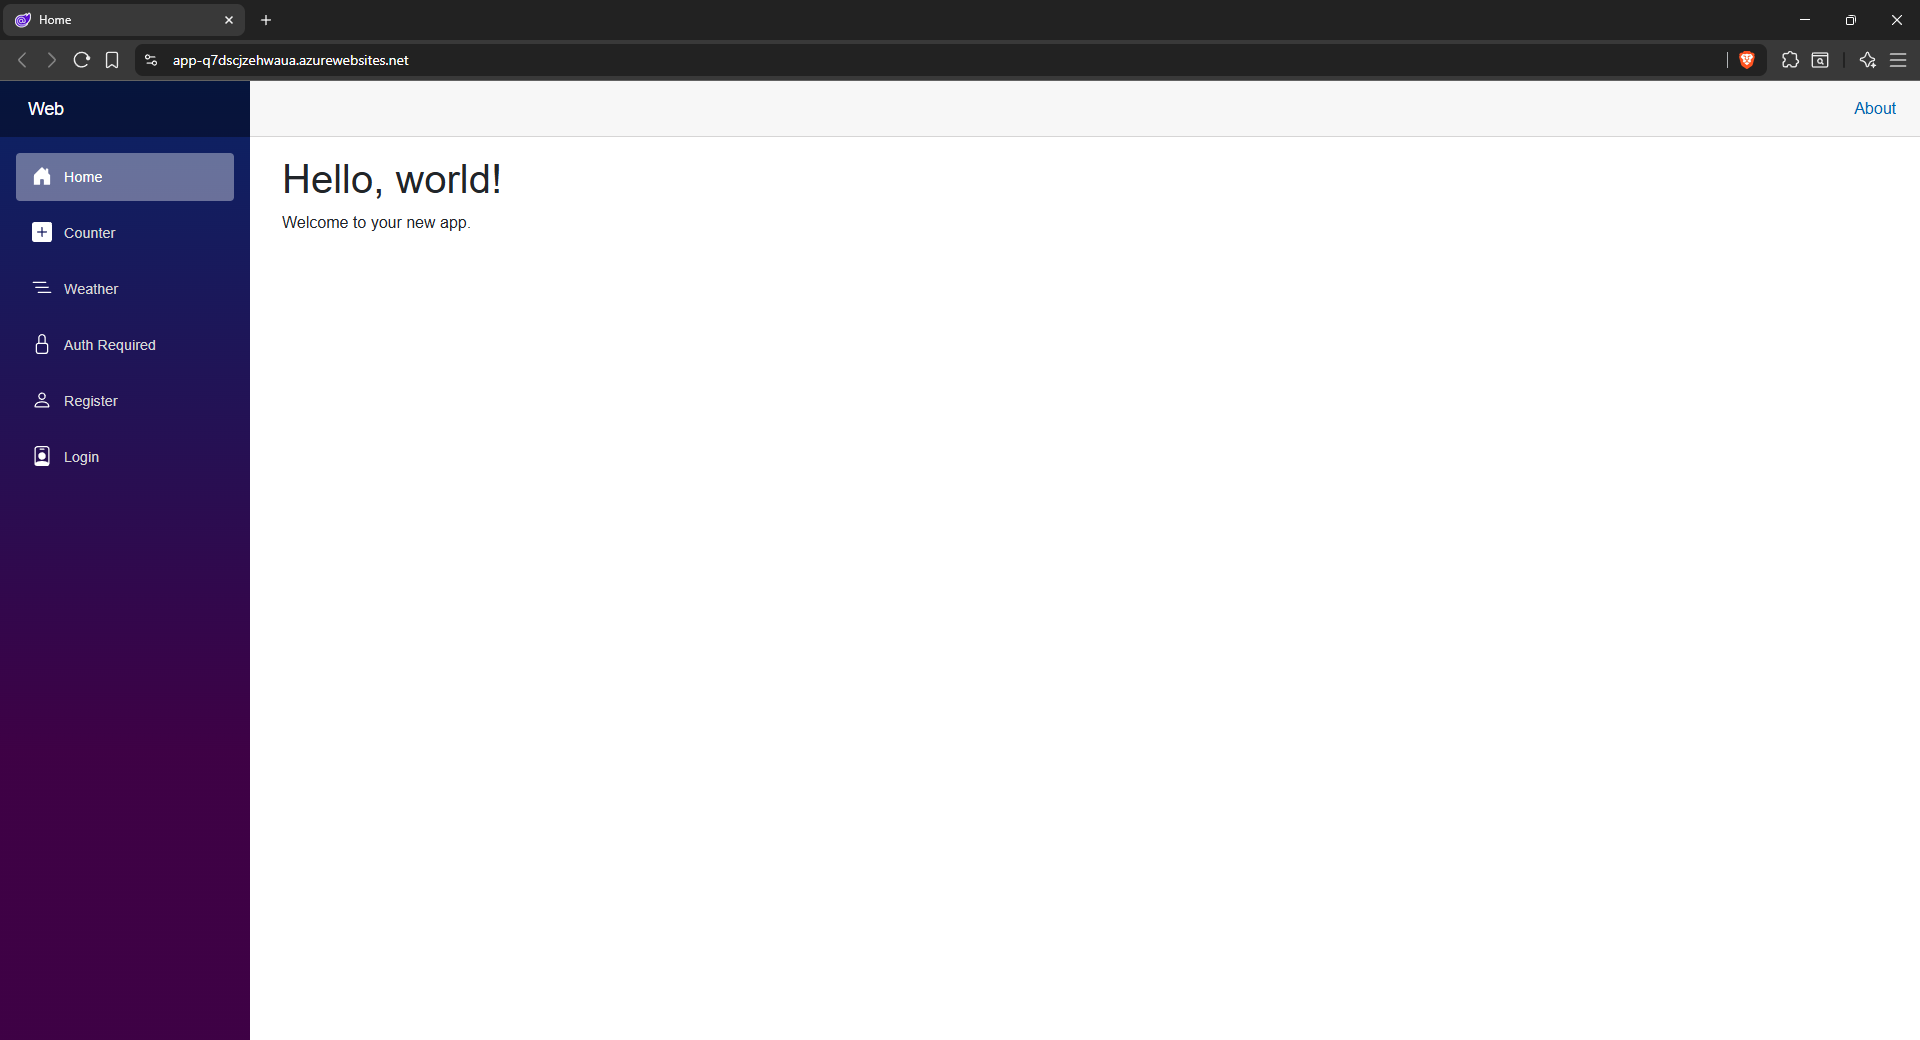
After that, we can run azd deploy to deploy the application. Once the deployment finishes, the output of the azd deploy command includes the application’s URL. When we open that URL in a browser, we can see the application running live.
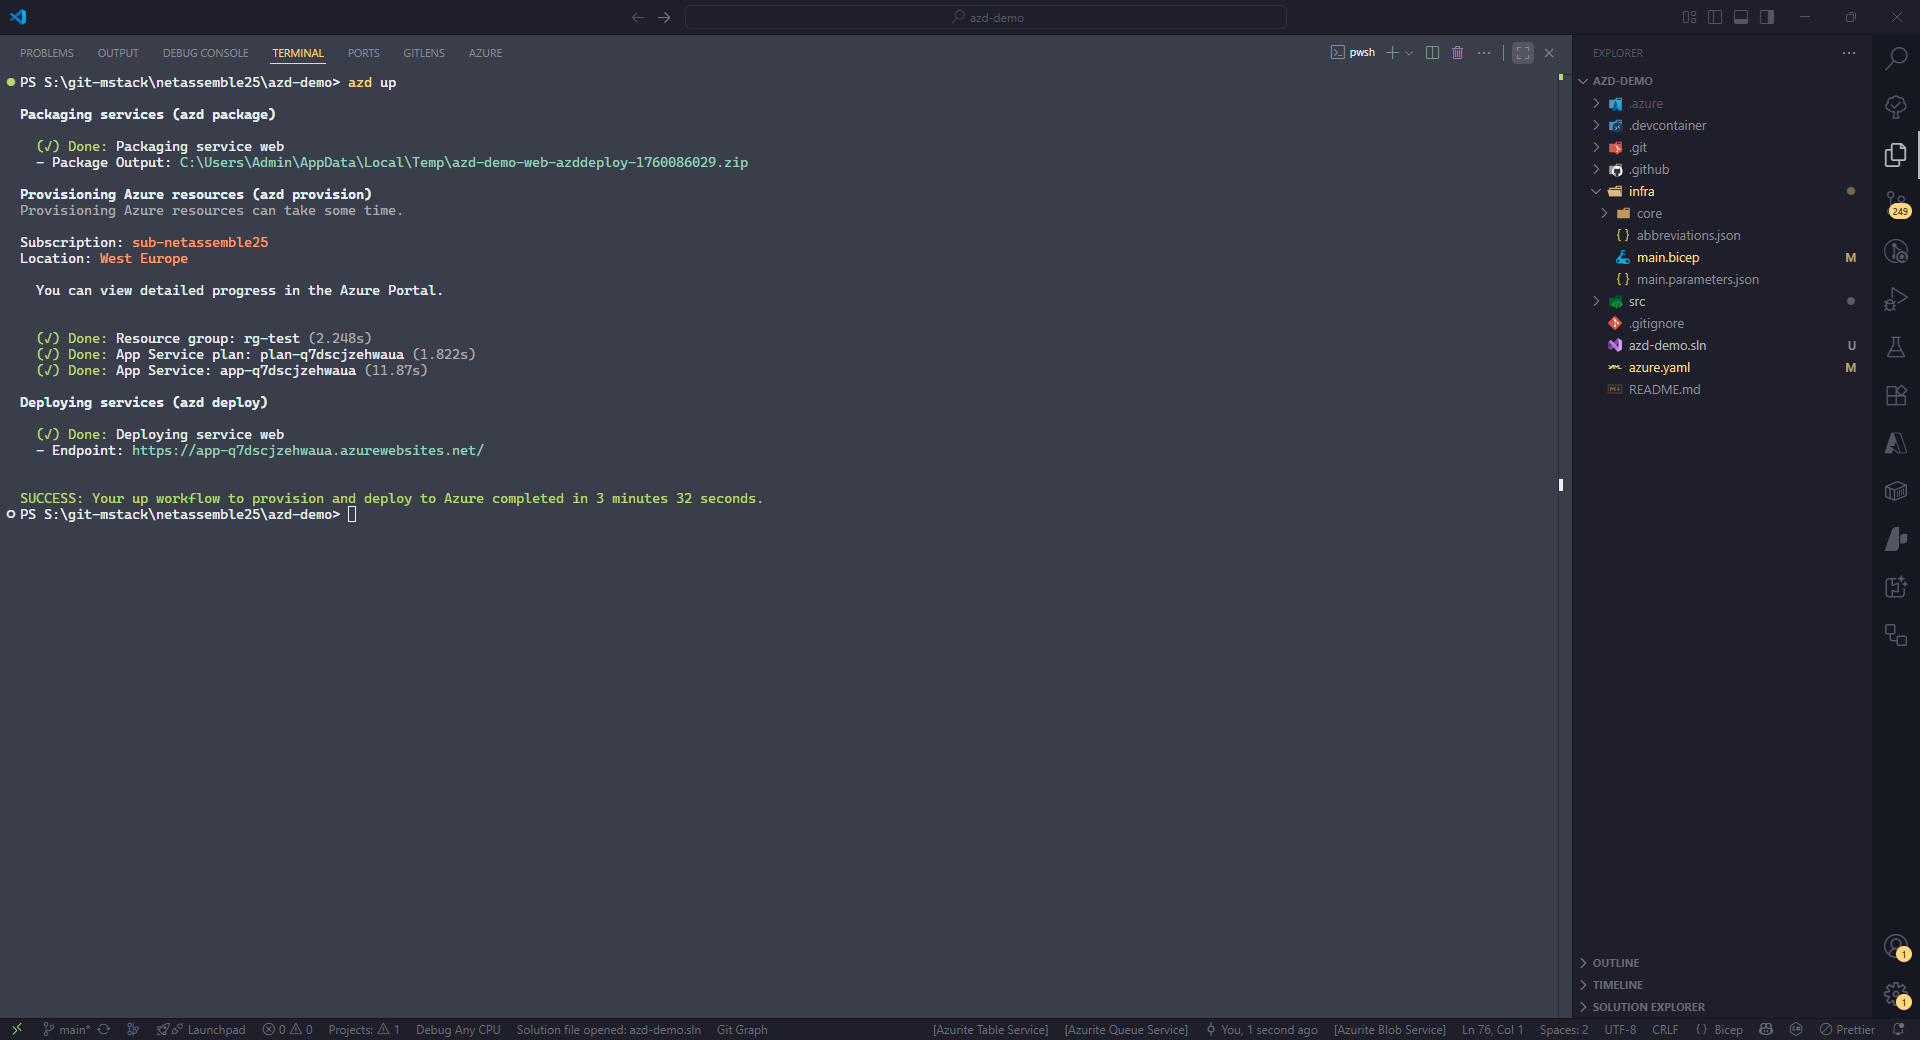
azd up
In the previous step, we needed to run azd provision separately after updating the tag values in main.bicep. To avoid having to run multiple commands in such scenarios, the up command was introduced. It automatically performs packaging, provisioning, and deployment in a single step.
If we had run azd up instead of the separate provision and deploy commands, the output from azd would look like the example below.
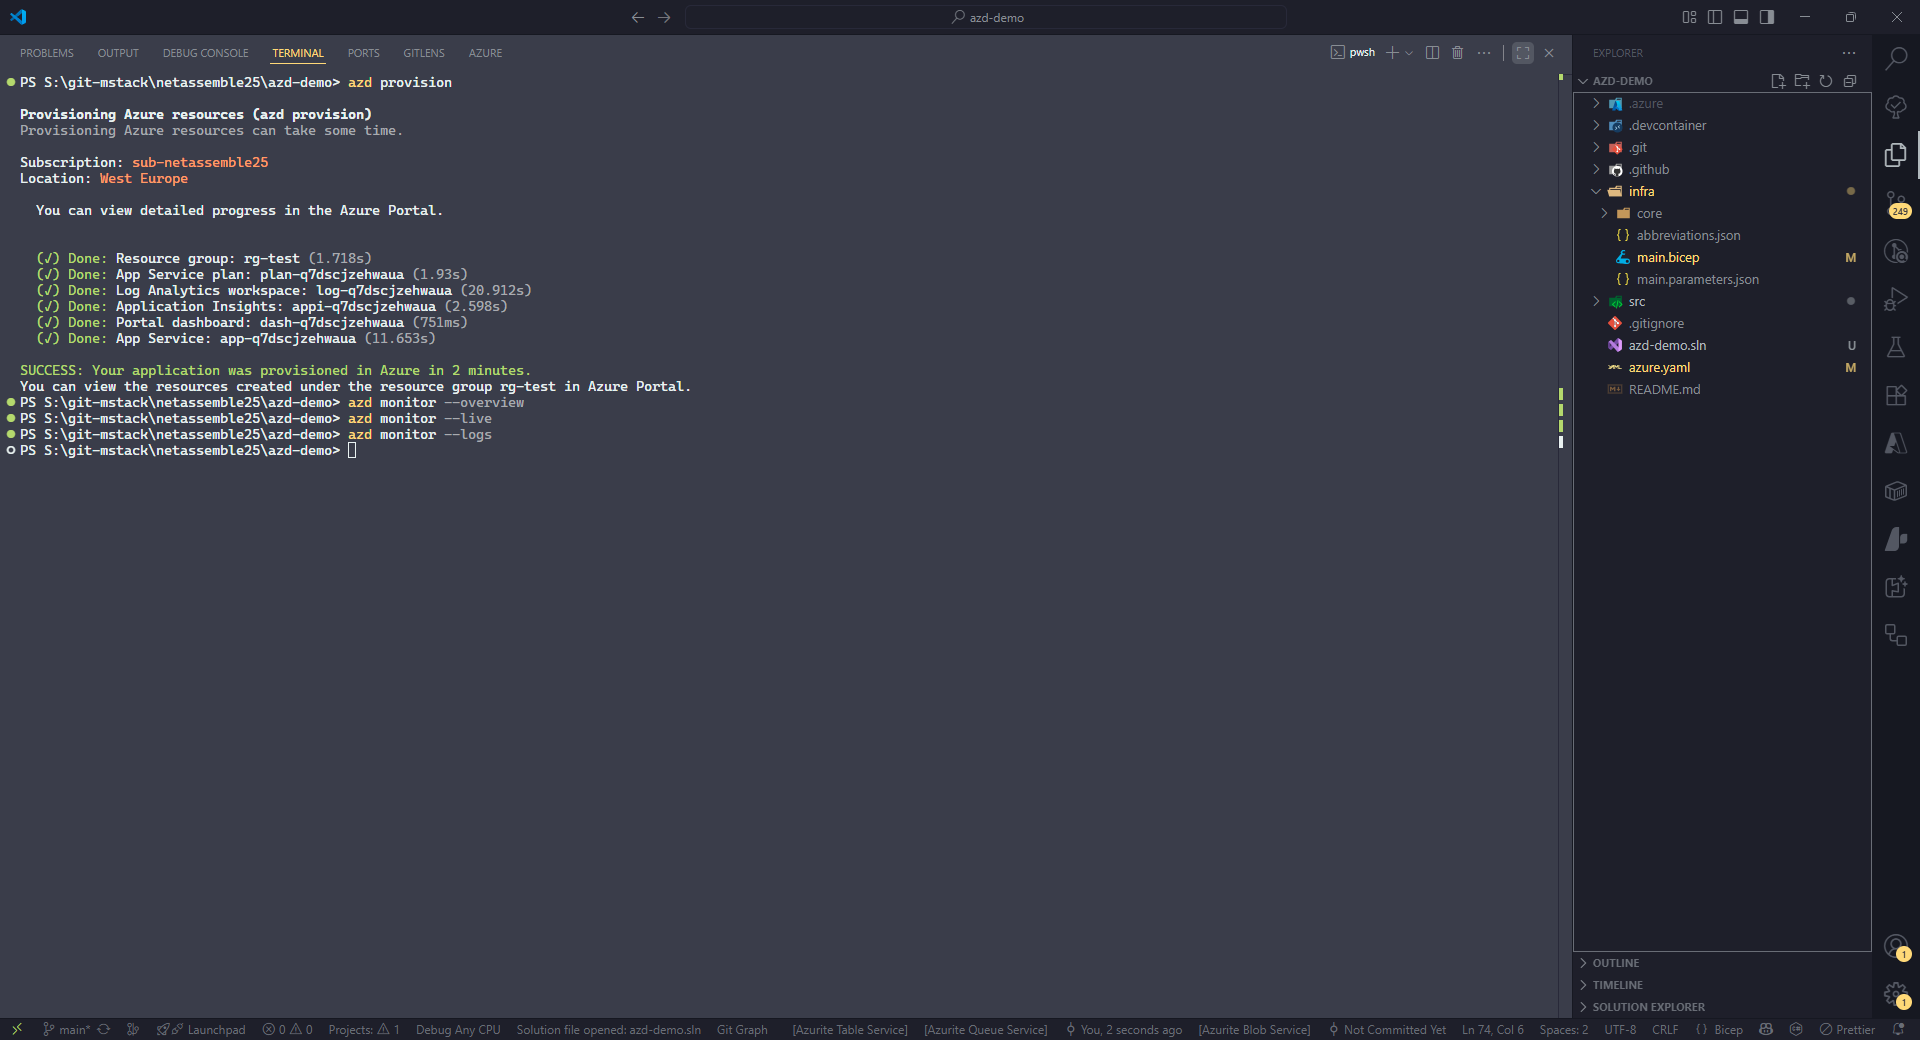
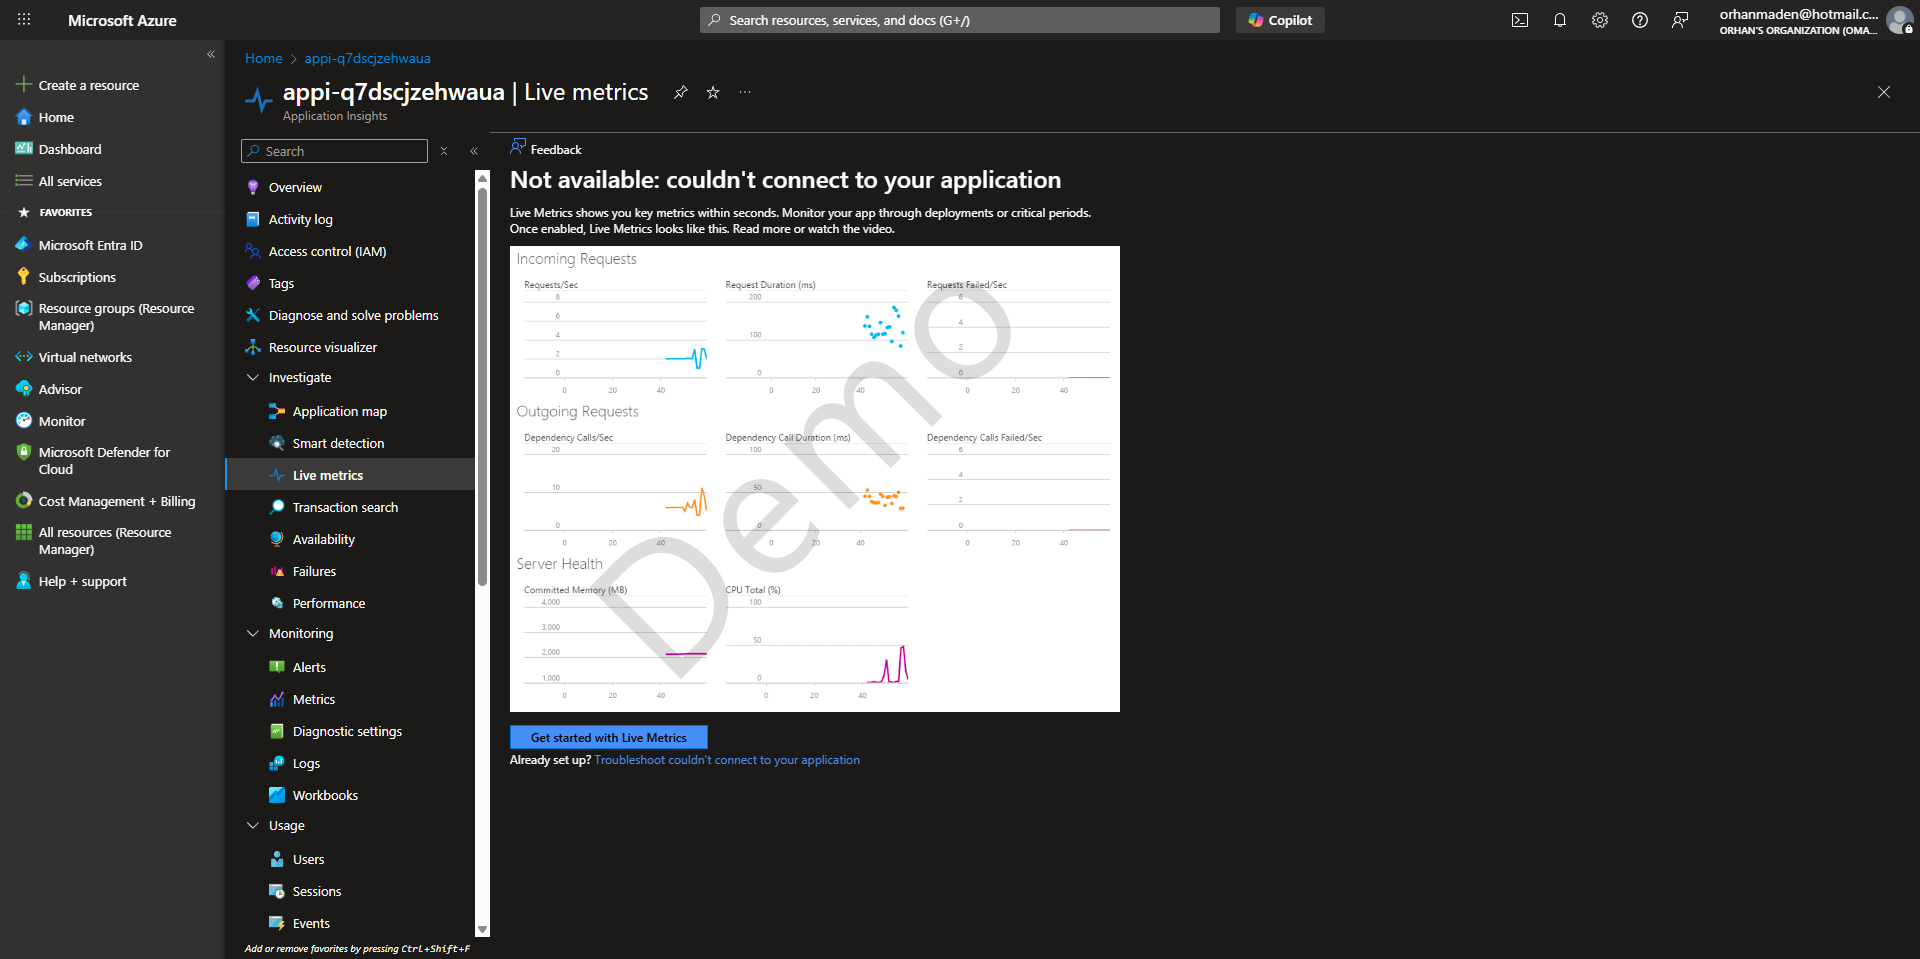
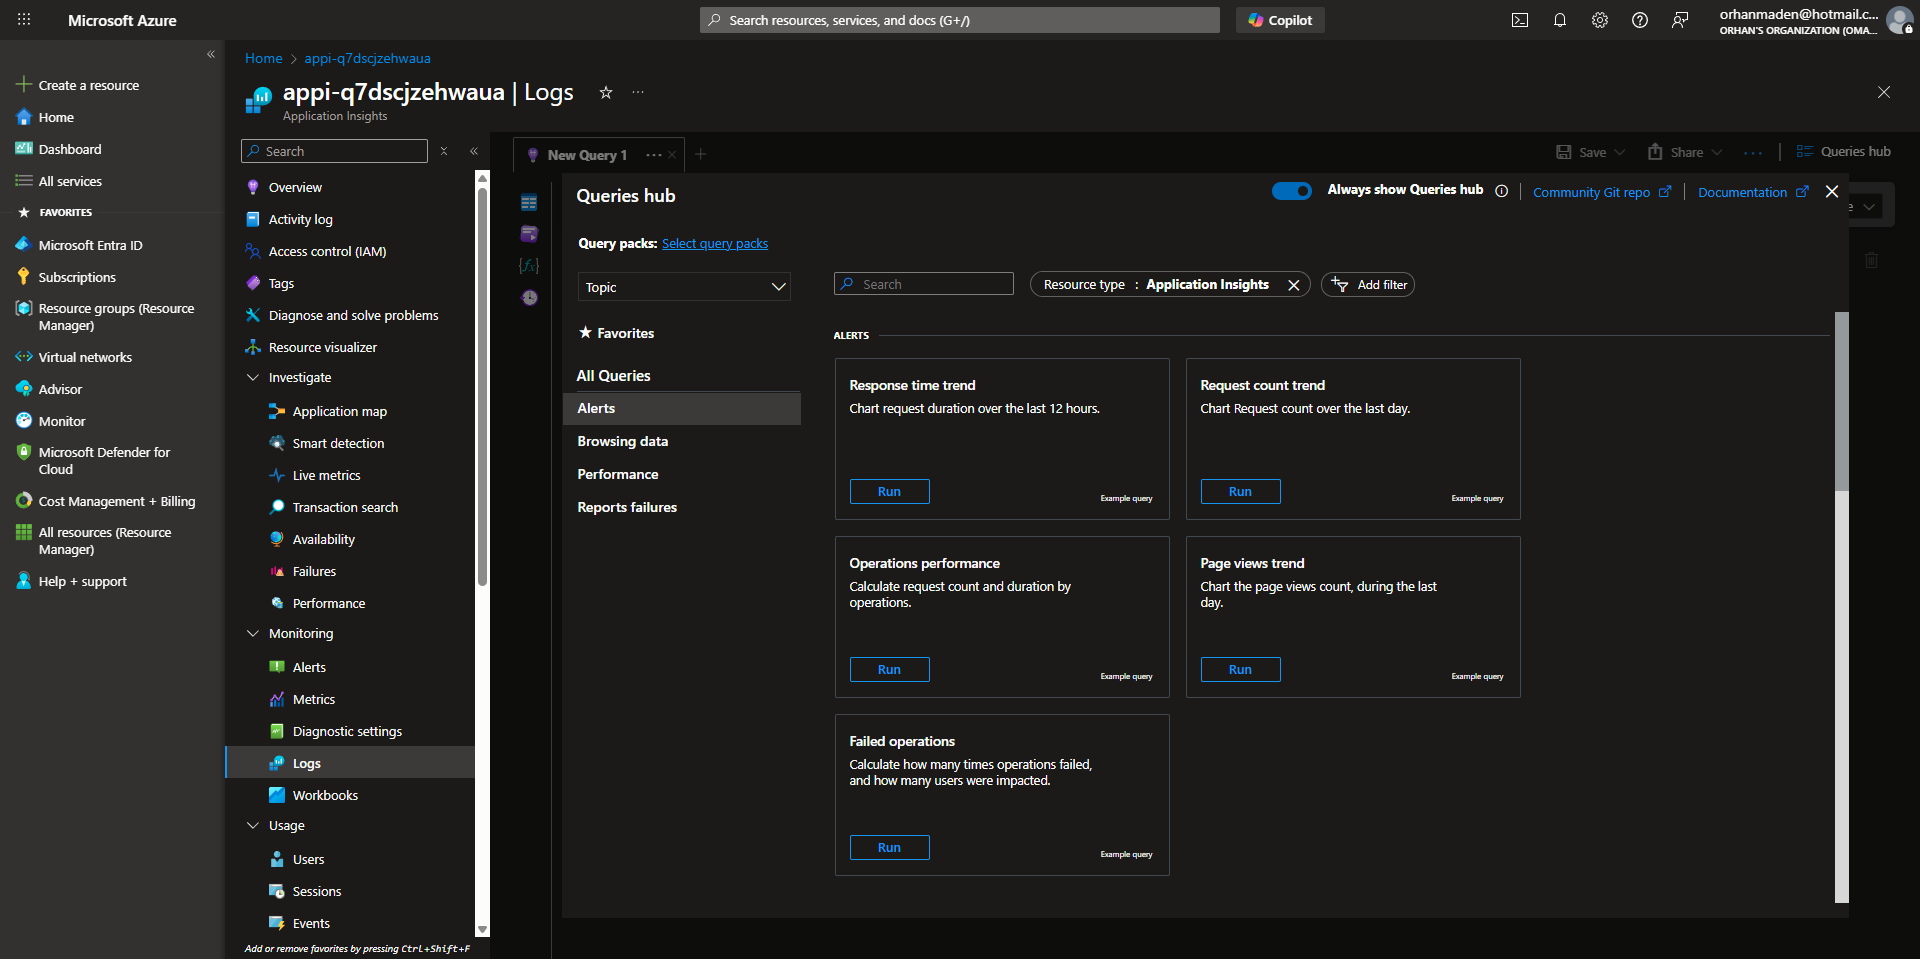
azd monitor
The monitor command opens monitoring dashboards directly in the Azure Portal. To work properly, it requires certain Azure resources such as a Dashboard, Application Insights, and a Log Analytics workspace.
The easiest way to deploy these resources is by using the Azure Verified Module pattern avm/ptn/azd/monitoring. To do this, we add the corresponding Bicep code to main.bicep and then run azd provision again.
1
2
3
4
5
6
7
8
9
10
11
12
13
14
15
16
17
18
19
20
21
module site 'br/public:avm/res/web/site:0.19.3' = {
  params: {
    ...
    configs: [{
      name: 'appsettings'
      applicationInsightResourceId: monitoring.outputs.applicationInsightsResourceId
    }]
    ...
  }
}

module monitoring 'br/public:avm/ptn/azd/monitoring:0.2.1' = {
  scope: resourceGroup(rg.name)
  name: 'monitoringDeployment'
  params: {
    applicationInsightsName: '${abbrs.insightsComponents}${resourceToken}'
    logAnalyticsName: '${abbrs.operationalInsightsWorkspaces}${resourceToken}'
    applicationInsightsDashboardName: '${abbrs.portalDashboards}${resourceToken}'
    tags: tags
  }
}
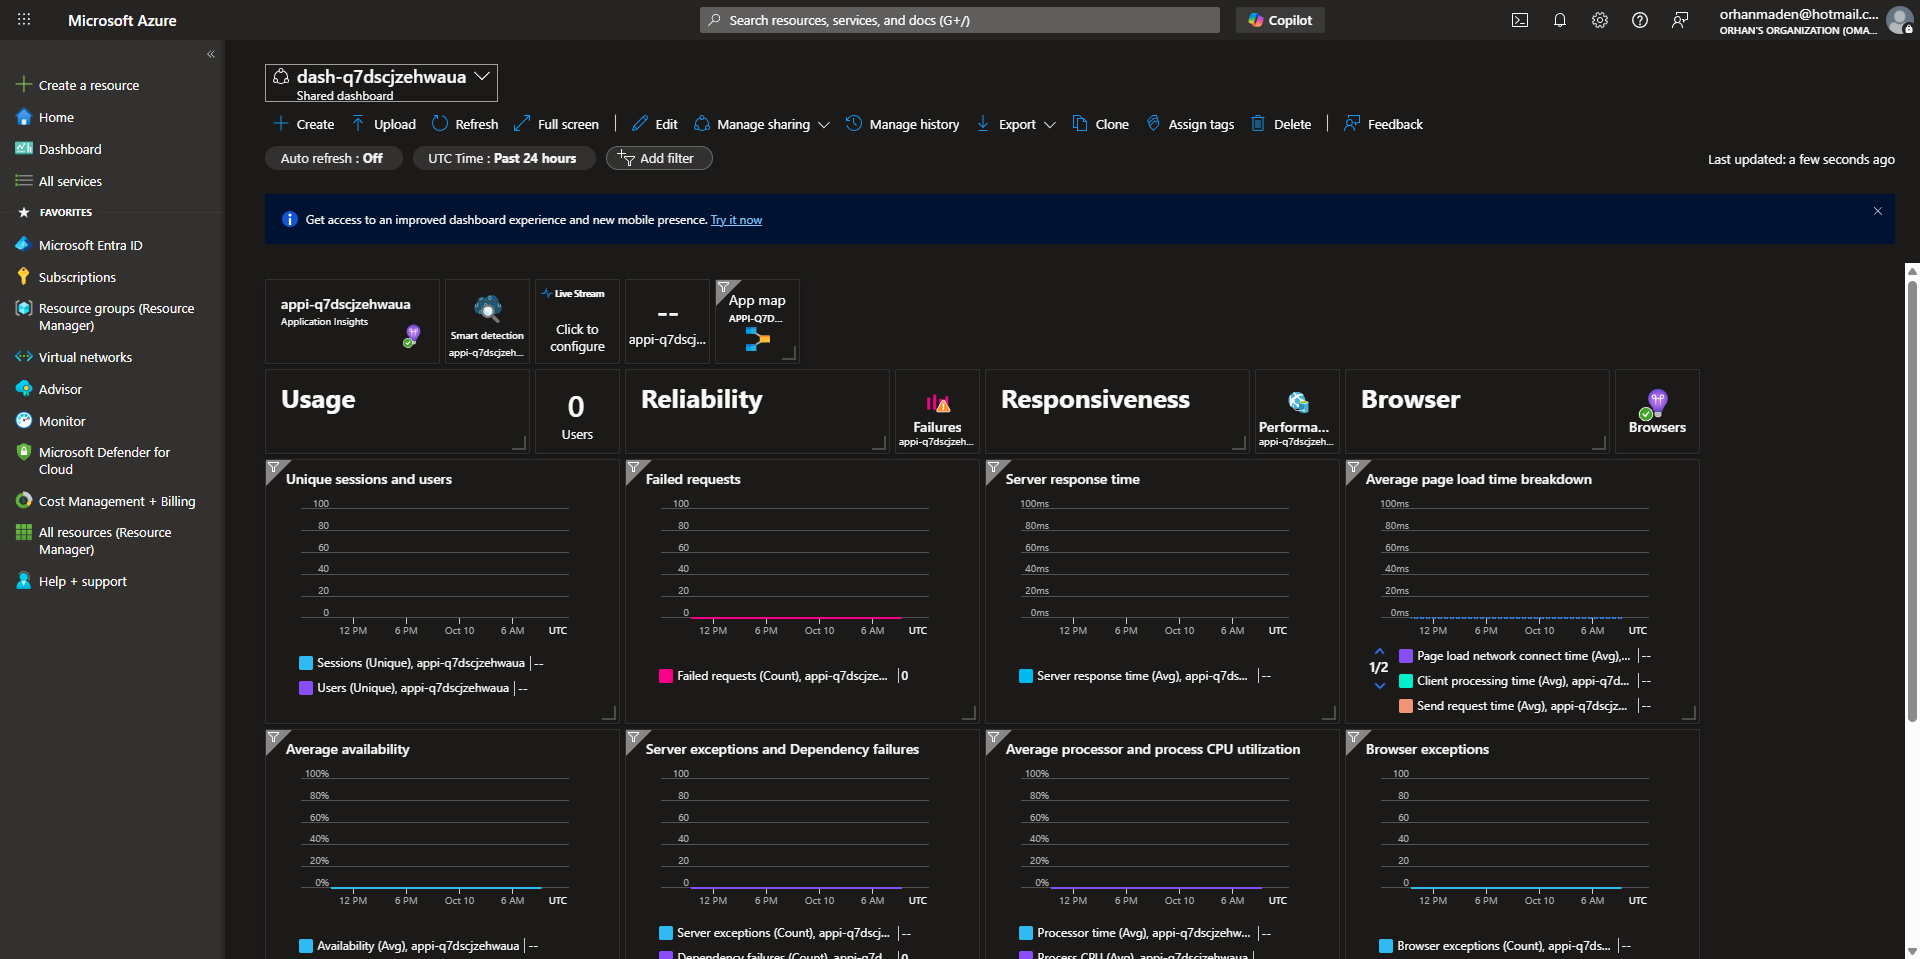
When running azd monitor with the parameters --overview, --live, or --logs, the command opens the corresponding pages in the Azure Portal, as shown below.
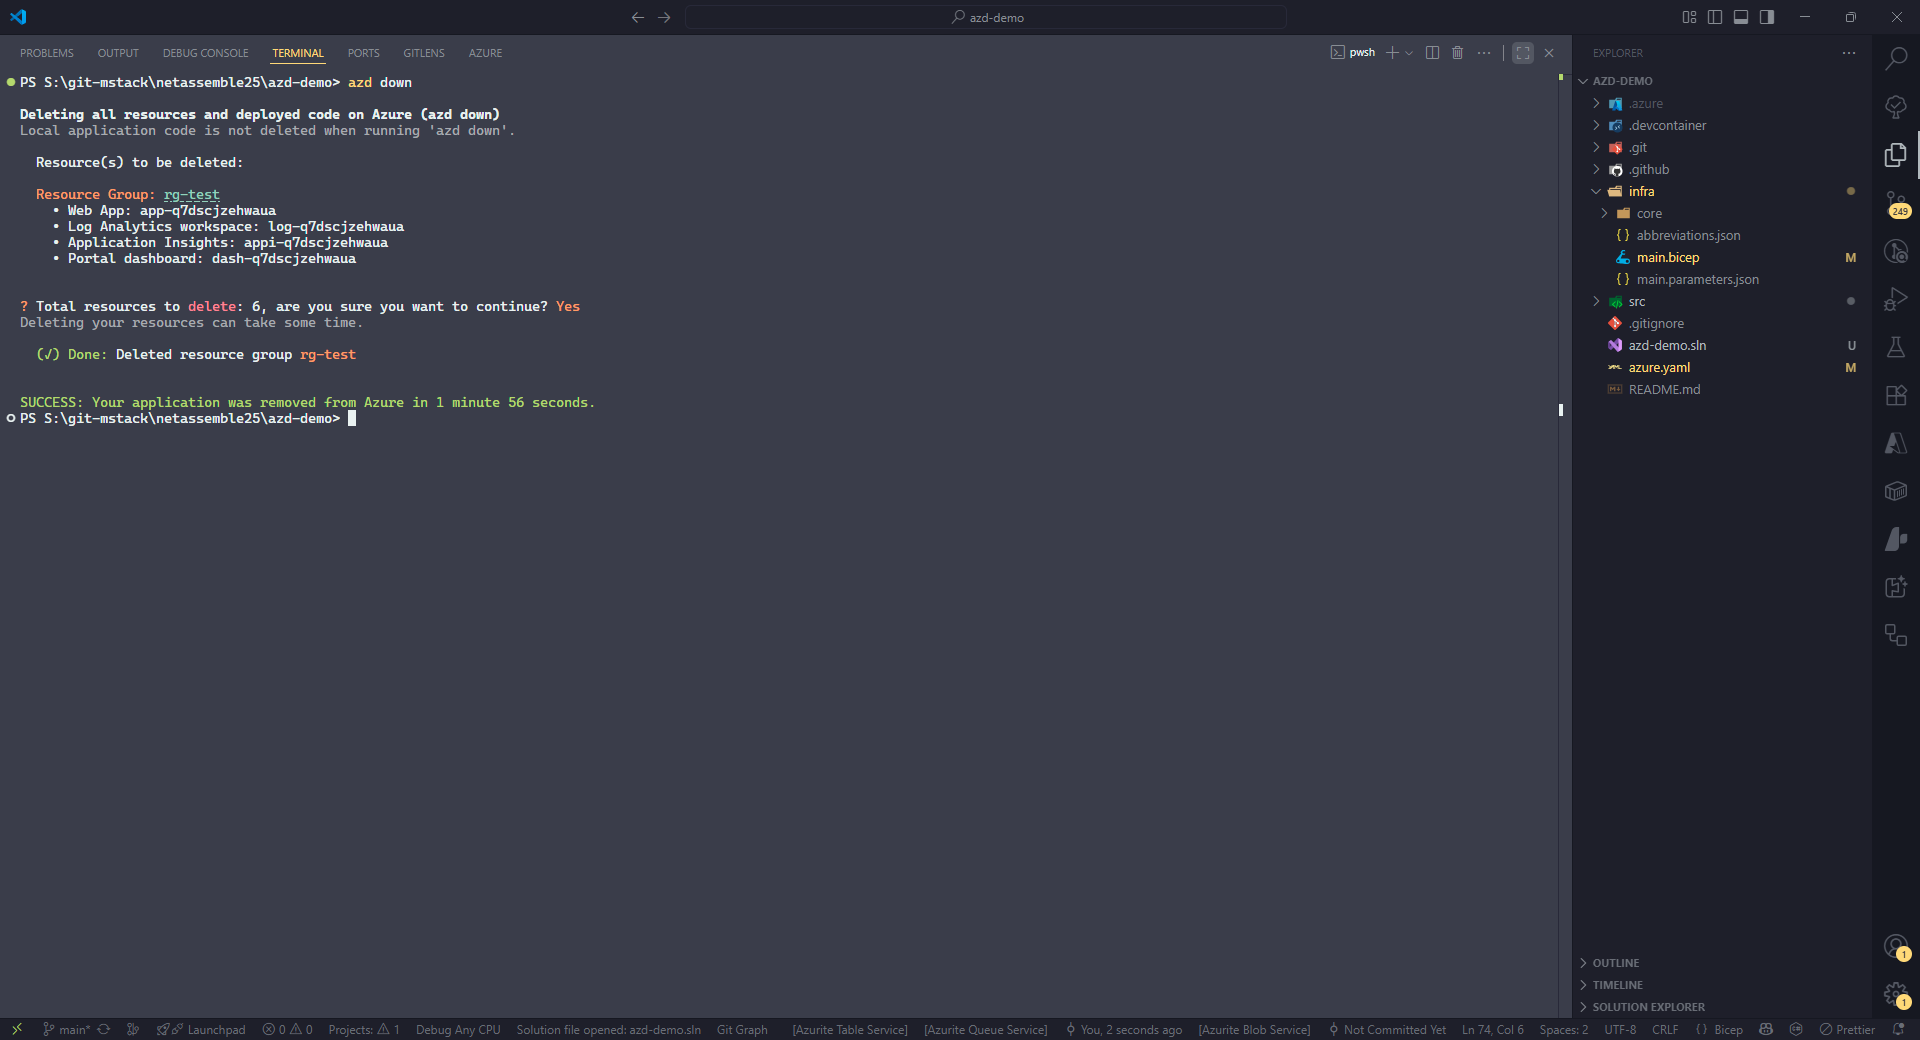
azd down
Finally, the azd down command can be used to delete all Azure resources that were created as part of the project. This also removes all associated deployments.
When executed, the command will prompt for confirmation before proceeding with the deletion.
Where is azd showing up?
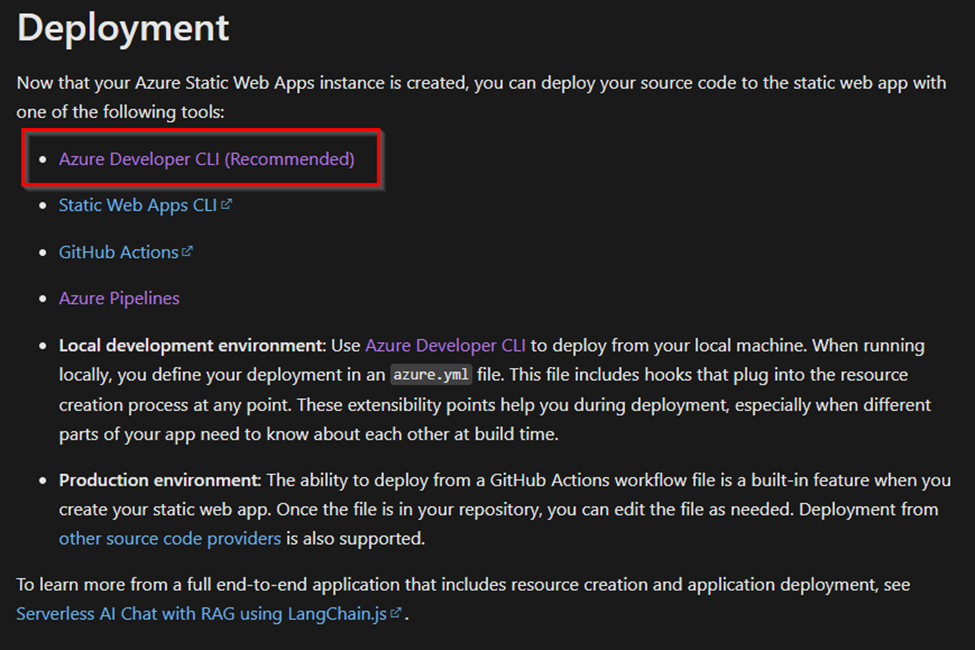
If you start looking around, you’ll notice that azd keeps showing up in more and more places. For example, according to the official Microsoft documentation, the recommended way to deploy Azure Static Web Apps is now by using azd. It’s listed right at the top of the supported tools, even before the Static Web Apps CLI.
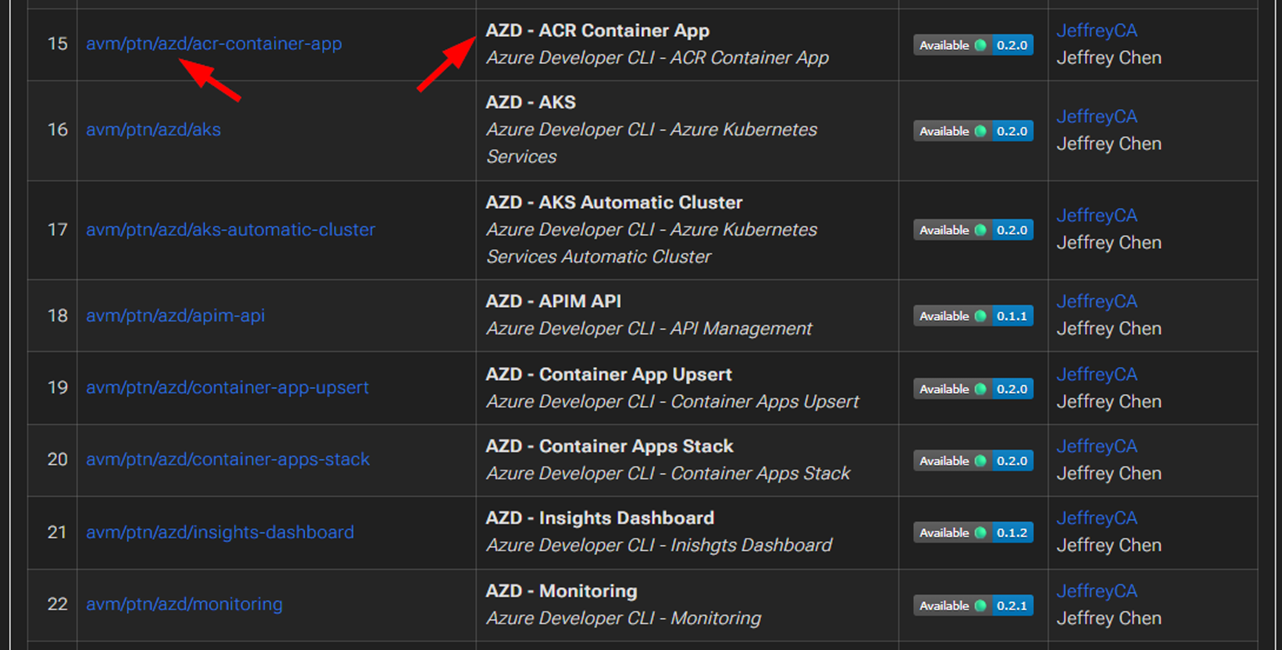
You’ll also see azd appear as part of the Azure Verified Modules catalog. Several modules now follow an azd pattern, such as avm/ptn/azd/acr-container-app, avm/ptn/azd/aks, avm/ptn/azd/apim-api, and avm/ptn/azd/monitoring. These modules show that the azd pattern is becoming a standard approach across Azure infrastructure and deployment automation.
References
Microsoft Documentation
GitHub Repositories
azd Template Galleries
- Awesome AZD
AI App Templates